Friday, September 12, 2014

The Davis man who cycled up Haleakala once but down twice

We're in Maui celebrating our 25th wedding anniversary.


We're here to celebrate 25 years of marriage! Just about half our lives married and more than half together.

Sandy just celebrated her 51rst birthday. I will be celebrating mine in a few weeks. You could say we're "51-50" in love with each other. "51-50" is police code for a crazy person.

Among other things, throughout or marriage Sandy has supported and at times I'm sure she's felt like she's had to put up with all my cycling. Even while we are here to celebrate our 25th anniversary, we spent one whole day apart while I went off on yet another cycling adventure; to climb Haleakala. A recent article in Bicycling magazine says it's the longest paved road climb in the world. Some of the locals I met while doing it think that is worthy of a "51-50."

Here I am at the top. Big smile 'cause all the climbing is done. Do I look crazy?
The following day, I climbed Haleakala a second time…in a bus with Sandy and several other people to watch the sunrise.

On top of the (Maui) world with my best friend in the world, my wife!
Then, we all got on single speed cruisers and coasted down Haleakala together, a common tourist activity.

That's Sandy in the green jacket looking back at me
Climbing Haleakala was a challenge. Except for some problems with the rental bike, the climb and descent was both spectacular and uneventful. The second descent on coaster bikes with Sandy and a group of other riders, some of whom hadn't ridden a bike in 20 years, was much scarier!

Haleakala Facts

"Haleakala" means "house of the sun." It is a dormant volcano on the island of Maui, Hawaii. It last erupted sometime in the middle of the last millenium. Weather at the summit can be highly variable. It's not unheard of to start in 90+ degree temps at the base and summit at near freezing temps with wind and rain. Typically, for every 1,000 feet in elevation gain, the temperature drops 3-5 degrees. Maui Cycling hosts a race up Haleakala called the "Cycle to the Sun." Ryder Hesjedal holds the record at around 2.5 hours.
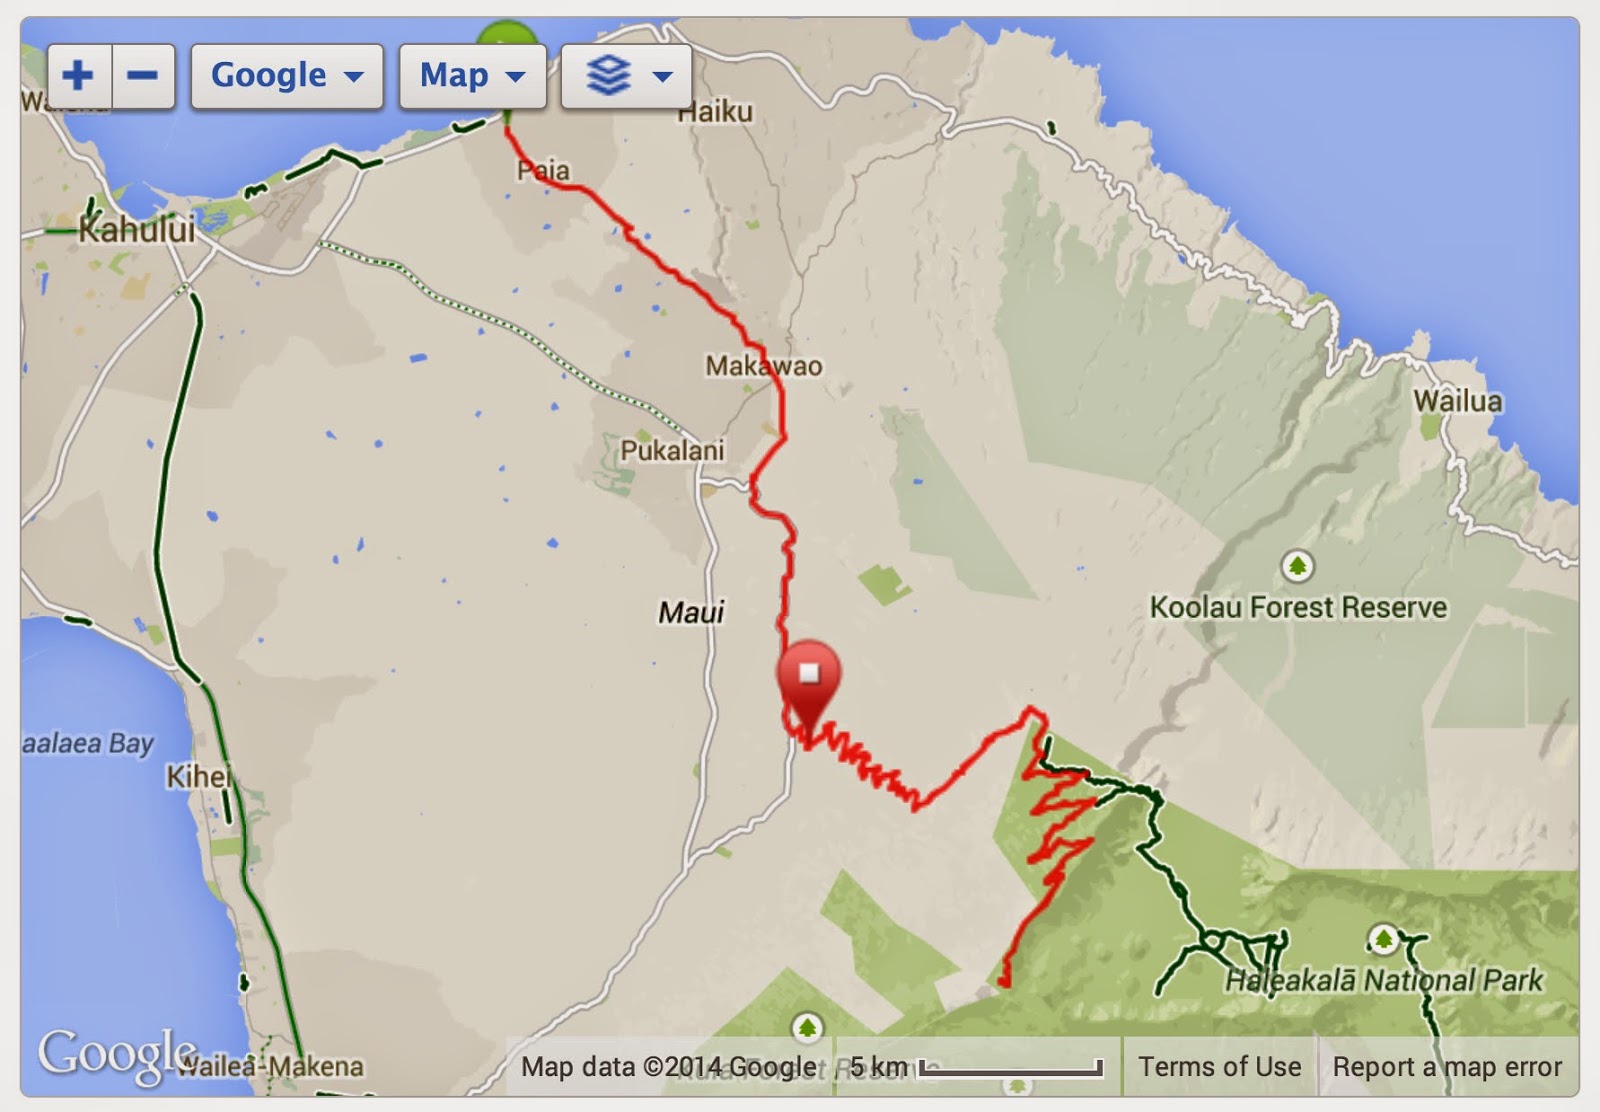

The route starts at Paia Bay on Baldwin road. After going 6 miles up Baldwin-Olivia Rd. you make a right on Hanamu Rd. until it intersects with a left turn onto 377. A few miles later, a left turn onto 378 takes you all the way to the summit. Once you turn onto 378, there isn't much in the way of civilization except for two Haleakala Park visitor centers. No water stops. No food. No shelter.

It is 36 miles from the base, at sea level, to the summit at 10,000 feet. There are only a few short sections of negative gradient  during the whole climb. Below 7,000 feet, the gradient is a pretty constant 5-6%. There is about a 200 meter section on Baldwin road just after crossing over 366 in Makawao that's around 8-9%. Once you pass into the park entrance, the gradient lessens a bit to 4-5%. The last quarter mile has a couple of sections less than 100 meters of 8-9%. The main challenge of the climb is that it simply never, never, never stops rising ahead of you.

Haleakala elevation profile from my Garmin 405. It ran out of batteries half-way down.
The climb is nicely divided into three pieces by two decent places to stop and rest. One is the Kula Market place at about 12 miles and 3,500 feet. There are public restrooms. There is a great selection of food and fluids. The other stop is the lower visitor's center just after entering Haleakala National Park at about 25 miles and 7,200 feet. There are public restrooms there as well and drinking fountains to refill bottles. If the center is open, you can purchase from a limited selection of small snacks. There is another visitor's center just below the summit with public restrooms. The park ranger told me the sink water there is potable.

Except for the first several miles on Bladwin road, the road surface is excellent. There is even a decent shoulder until you enter the park at 7,000 feet. On the route I took, there are four cattle guards. They are fine but something to remember when you are descending at 35+ mph.

Haleakala is a tourist attraction much as the rest of Maui. So, there are a lot of motorists with little to no experience sharing a narrow road with cyclists. But, I think that means motorists wind up being much safer than a typical northern California driver might be. I didn't have any issues with motorists and plenty of vehicles passed me. There are signs all along the route reminding motorists that bikes "share the road." I felt very safe on both the ascent and descent.

You should carry two water bottles, some food and extra layers to put on for the first several thousand feet of descent. A rain shell would be a good idea too. The day before I was there a couple of riders got hypothermia while descending and had to be bused back down.

The terrain varies dramatically all the way up. At the base, the land is rural agriculture with some light residential. It's hot and humid and not much in the way of shade trees. Winds are nonexistent or light. At about 2,500 feet, it's rain forest; lots of big trees with plenty of shade. Between 2,500 and 5,000 there can be clouds and fog. Even if its not raining, there is so much humidity water condenses out on the trees and drips almost as if it might as well be raining. There is a very abrupt change from rain forest to native grasses and no trees. Eventually, the grasses give way to red volcanic rock and small shrubs. Above about 9,000 feet, all you see is black volcanic rock likened to being on Mars.

Finally, there is a $5 fee at the park entrance, 24 miles and 7,000 feet into the ride. So, be sure to carry some cash or credit card.

Up Haleakala Once


My home town of Davis is flat in every direction for more than 25 miles. I haven't seen anything that looks remotely like a hill since completing the Eastern Sierra Double back in June. So, why attempt a climb like Haleakala? Mainly because I don't know if I will ever be back in Maui again and I didn't want to pass up the chance to ride it.

I drove to Paia arriving there a half-hour before the bike store opened. This was my view of Haleakala from the car at about 7am on the way from Lahaina to Paia. Look at how clear it is! It doesn't stay that way.

View of Halakala from the car on the drive over to the start.
For comparison to a local climb, here is a picture with Mt. Diablo inset in approximate relative scale.
Approximate relative scale to Mt. Diablo

First problem upon arriving in Paia: where to park? The main (and only) street in Paia has only two-hour parking. The bike rental store had no space to park either. I drove a few blocks up Baldwin road and found an empty gravel lot that was labeled for public parking.

I would have liked to get started pedaling by 6am. However, the store I rented from, Maui Cyclery, didn't open until 8AM. So, I decided to start the climb as soon as possible after the store opened and hopefully be back to return the bike by the time the store closed at 4pm. Apparently, many of their customers attempt that but don't actually make it.

It's not a very good sign when the rental shop doesn't even have printed route sheets and instead walks you through the route verbally while pointing to a tiny map pinned to the wall. "Oh, by the way, if you miss this turn, you ride 5 miles and climb 1,500 feet to a dead end." Or, when you return the bike and tell them you think the bottom-bracket is failing and they respond "I thought Joe had fixed that." I plan to do a follow-up blog about rental bikes. Needless to say, I had some technical difficulties with the bike! But, I did bring my own pedals, shoes and saddle.

I reserved a 59cm Lightspeed carbon frame with 105 components and a compact double with a 12-30 cassette. It's my first time riding a compact double and only my second time riding carbon. They put on my pedals and saddle. Because time was precious, I test road it only a minute or two and made some adjustments, mainly to seat height. They included a tool bag with tube, tire irons and CO2 cartridges. Because I rarely use CO2 and find it unreliable, I would have preferred a pump. I had to ask them to please include a multi-tool so I could make adjustments en-route if necessary. Good thing I did too. More on that later.

Two other riders came in just behind me for the same reason; to climb Haleakala. As they got fitted out, I gathered my gear, filled two bottles with water and started up. It is hot in Maui reaching temps of 90 degrees at sea level. But, its also very humid too, a bad mix. Worse, the sun is intense and I burn easily. So, I not only had on sunscreen, I also wore sun protective garments such as you see me wearing here.

These extra layers make me sweat even more. I was very concerned about proper hydration, electrolytes and cramping. I planned to take one electrolyte capsule every half hour. The sweat was dripping off me the first few thousand feet of climbing. Fortunately, as you climb, the temperatures drop to something more comfortable.

I was drinking constantly. But, I was a little concerned how easily my water bottles slid into the cages. The cages didn't really hold on to the bottles. The bottles just sort of rattled around inside the cages. That's fine for a 7 mph climb because your unlikely to hit a bump hard enough to bounce them out. But, not on a 35 mph descent. I had a bad feeling about those cages.

Not long after I started up, the bottom bracket on my rental bike started creaking. The cranks seemed to turn smoothly but with every turn there was a creaking sound. I figured if the bottom bracket failed entirely, I would just turn the bike around and coast back down to Paia. But, it was a thought that plagued me more as I got further into the climb. I would hate to do so much work and then have to abandon.

Next, about 9 miles into the climb, something happened to my seat mount. The saddle went from being perfectly secure to flopping up and down 20-30 degrees. At first, I thought something had broke. But, I didn't hear any metal parts fall to the ground. Nonetheless, I went looking down the road behind me for parts that may have come off. I didn't find any.

It was a two-bolt seat mount with bolts fore and aft that offer ultra-fine adjustment of seat angle. Ok, so now you see why I asked to have them include a multi-tool in the tool bag. I used the tool to tighten the aft bolt but it did little to tighten the seat. It was still flopping up and down. The front bolt needed tightening. However, the multi-tool they included in the tool bag (similar to the one pictured below)


couldn't reach the front bolt. I mean, if you succeeded in actually getting the hex key into the bolt, you could not turn the tool more then about 1/5th of a turn without it hitting the seat post and preventing further turning.

It was then that the two riders I met in the shop caught up to me. However, only one of the two had a tool bag and the shop didn't include any tools in it. The other rider without a tool bag would later turn around at mile 32, around 9000 feet, and ride back alone with no way even to repair a flat if he had one.

I tried to flag down one of the many vans supporting downhillers. These are novice riders who were bused to the top and then coast down on single speed cruisers; an adventure Sandy and I would do the following day. There were hundreds of these riders passing me on the downhill side. But, none of the vans supporting them would stop to render me any assistance. That was really frustrating! After about 20 minutes of 1/5th turns of the fore saddle bolt, I was able to get the saddle secure and continue riding.

I stopped at Kula Market Place about 12 miles and 3,500 feet into the ride to re-fill my bottles and eat some food. Some locals asked me how my ride was going. They thought I was headed down. When I told them I was on my way up, they got very wide eyed! "To the top?" they said, somewhat alarmed. "That's the plan. We'll see if my legs (and bike) can hold out." I said. They wished me well and reminded me to be careful on the road.

Before leaving Kula Market, I adjusted my seat height again. Because I am not familiar with carbon frames, I am unsure how far to tighten a seat post bolt. Too far can irreparably damage the seat post or seat tube. But, too loose and the seat won't maintain the desired height. For fear of breaking things, I think I was going too loose. So, the seat would slowly fall. I would wind up stopping several more times to adjust it again and again. Although I could have seen this as a major nuisance, it actually gave me a great excuse to stop and rest a bit too.

At the 4,000 foot sign.
The park entrance is at about 7,000 feet and 24 miles into the climb. One of the two riders, the one without any tool bag, was there resting. His riding buddy had continued on without him. So, now, he joined up with me. About a mile beyond the park entrance is the lower visitor's center where you can refill bottles and use the restrooms. If the visitor's center is open, you can also buy some small snacks too. I stopped there for about 10 minutes and gave Sandy a call to let her know how things were progressing. She was taking an all-day bus tour on the Hana Highway. I ate a Power bar and a Stinger wafer I was carrying. The other rider who briefly joined me decided to continue on instead of rest. But, not long after he left, he passed me going the other way, descending, deciding his legs had had enough for the day.

Once you pass into the park, the gradient reduces somewhat to something more like 3-5%. Well, that's true up to the last quarter mile. In the last quarter mile the gradient pitches up to 8-10% for a couple of 50-100 meter sections. That's brutal at that elevation with about 36 miles and 10,000 feet of climbing already in your legs.

Once you are in the park, there is really no shoulder at all and no guard rails. And, the drop off the side of the road is steep and jagged with volcanic rock.

And, at the 8,000 foot sign
By this point, my legs don't feel great. I mean, I feel fine but my legs are just sluggish. They are sore. I can still turn the cranks ok but its like I don't really want to anymore. I am frequently changing gears and standing to vary my cadence. My technique is off. My back is hunched and my breathing is not deep and relaxed. My heart rate is ok though; mid-150's. I stop several times to rest too and eat some more and adjust my seat height. Occasionally I wonder if I really have what it takes to get up this beast of a climb. I mentally start dividing the mileage and elevation remaining into manageable pieces. "At the park entrance, there are 12 miles and 3,000 feet left," I think. I divide that into two pieces. "6 miles and 1,500 feet to mile 30. I will rest there for a few minutes," I say to myself.

But, I wind up having to rest at mile 28 for a few minutes. I click back in and push past mile 30. I am staying in the lowest possible gear at this point. My cadence is decent, 60+, but I don't feel confident in my legs. I shift two gears to stand for a while. That feels better...for a while...until it doesn't anymore. I slump back down into the saddle. There are "mile markers" all along the road. Where I turned onto 378, a sign said "22 miles" to the summit. I just pass "MM18". That means 4 more miles to go. Not long after, some structures and the observatory come into view. I can see the summit now. The weather really couldn't be any nicer. Its full sun and the temperatures have to be in the mid-50's and the wind is light. The time is around 1:30PM. I stay in my lowest gear and just spin. I don't feel like I have much in the way of power but I also start to feel like I have enough to finish it.

I see the small shack at the very top and people walking around it. There are less than two miles and less than 1,000 feet to go. I reach the upper visitor's center at 9,700 feet. There is a big parking lot and I pull off to rest for the final push to the very top. My heart sinks a bit when I look at the road ahead. It's steeper than anything else I've seen up to now. I contemplate calling it "good enough" and turning around. After a few minutes rest though, I decide to push for the last quarter mile and few hundred feet.

As I hit the first of two 8-9%+ sections, my heart rate climbs, fast! I don't feel very good. I am wondering if I am pushing myself too hard at this elevation. This is the highest I have ever pedaled a bike. But, It's too steep to safely click out with cars coming up from behind and going down. I take a deep breath and try to relax and just keep the cranks turning. I make it over the first steep section and round a bend to see the upper parking lot. The end of the road is in sight! One more somewhat less steep section of maybe 100 meters lies ahead. I push over it more easily than the first. I pass the 10,000 foot sign and loop around the parking lot. I made it. I'm done. 6 hours! God that was long and hard!


Down Haleakala Once

I did not spend much time at the top. I took some pictures to prove I was there. Some motorists passed by and stopped either to congratulate me or inquire as to my sanity. Others just passed shaking their heads. One stopped and offered me a Coke. I took it. I wished it was cold though.


I put on some layers for the descent and started down. Now, you would think that with all the problems I had with the bike, I might have taken some extra time to inspect wheels and brakes before I started down. Nope. In retrospect, given my experiences the next day with our coaster descent group, failing to carefully inspect the bike myself before descending was just plain stupid! I was a little lucky I didn't have any major problems on the descent.

While descending I am reminded of another minor issue I had with my bike. I am accustomed to and prefer to ride with a rear view mirror so I can see traffic approaching me from behind without having to turn my head. That's especially important during the descent phase where speeds are higher and you really don't want to take your eyes off the road. However, my rental bike was not equipped with one. I supposed if I had thought to ask for one, they may have provided it. I don't know.

It was easy to keep up with car traffic on the way down. My descent speed was 25-35 mph almost the whole way down. It still took close the two hours to descend all the way back to Paia. The one problem I did have though was hitting cattle guards at 30+ mph with my loose water bottle cages. One of my brand new bottles popped out. Fortunately, I noticed it immediately and turned around and found it on the side of the road. When I got back down to about 2,000 feet elevation, I had to remove all the extra layers I had put on. It was just uncomfortably hot. In fact, I removed every layer except my jersey stuffing everything into the available pockets.

Another serious problem with the descent is that the views are just spectacular! They are a huge distraction and you can wind up wanting to take your eyes off the road for longer than you should at 35+ mph.


Otherwise, except for the cattle guards, the descent was uneventful. I arrived back down in the Paia parking lot where I had parked my car at 4:15PM. I called the bike shop from there to see if they were still there for me to return the bike. They were!

So, I threw the bike in the back of the car and drove to the shop to return it. I explained all the problems I had, including the creaking bottom bracket. "I thought Joe (or whoever) fixed that," they said. So, they rented me a bike they knew they were having problems with and didn't bother to mention to me to keep an eye out for it. They said they "felt bad" for all the troubles I had with the bike and there was talk of offering me a discount. Nope! They charged me full price. I didn't complain.

But, I just would not ever recommend using this bike shop to anyone else. I've heard good things about West Maui Cycling. Because we were staying on the west side of the island, that would have been a better choice anyways as I wouldn't have had to worry about getting the bike back the same day to avoid two trips to the shop. And, I would have had more time to test the bike out and adjust it before taking it on such a challenging ride.

Down Haleakala Twice

The next evening, Sandy and I got up at 1am to meet a 2am bus to take us to the top of Haleakala to watch the sunrise. This is a popular activity for tourists and locals alike. The cheesy touristy version includes a ride back down on a coaster cruiser bike. That's what I had planned for Sandy and me. We got to bed around 8PM that evening and so actually got about 5 hours sleep before waking up to meet the bus.

We watched the sunrise at the upper visitor's center. There were a lot of people there doing the same thing.
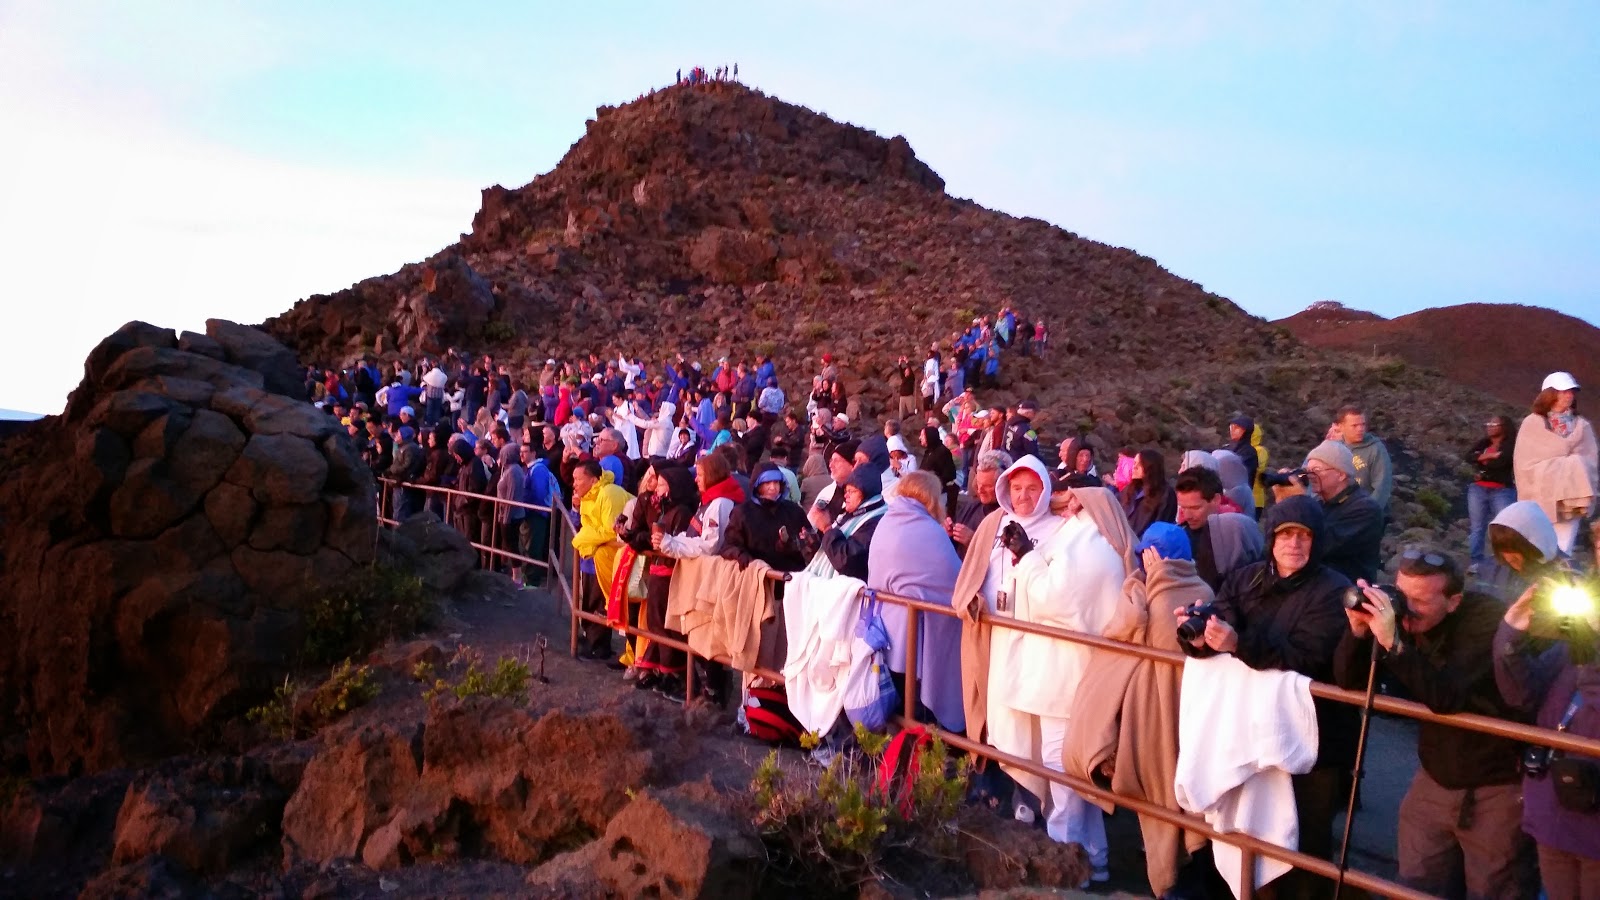


We were at 9,740 feet elevation. That is the highest elevation Sandy has walked around at. We did go over Tioga pass at 9,943 but we never got out of the car and walked around.

The sunrise was incredible. We even saw the tiny dot of light of the international space station pass overhead. But, it was a bit of a cloudy morning to the east too. So, the sunrise wasn't as spectacular as it can be. No mind. It was truly amazing. Then, the second half of our adventure was to start; a bike ride down Haleakala.


The way the activity was described on the Costco Travel website, I had envisioned that after the sunrise, we'd get on bikes at the top and just coast all the way down to the bottom. Not so. They don't allow commercial cycling companies inside Haleakala Park anymore due to some bad accidents. So, after watching the sunrise, we got bused down from 9,740 feet elevation to just outside the park entrance at 6,500 feet elevation; fully 1/3rd of the total ride. I wanted Sandy to experience the whole descent, top to bottom. Strangely, she was ok with doing only a portion of it.


We got out of the bus on the side of the road and were assigned moto-cross helmets and single speed cruiser bikes with hand operated drum brakes front and back. The drum brakes make a lot of sense. They are much more reliable and longer lasting than rim brakes. Our guides introduced themselves and then had each person in our group say their name and how long its been since they last rode a bike.

Two members in our party said they hadn't ridden a bike in more than 20 years. That was a concern to both Sandy and me. This couple was celebrating their 30th anniversary. So, they were a bit older than Sandy and me. After spending a couple of hours at near 40 temps at the top, everyone was a bit cool too.

Our guides explained that for the most part we should just brake with our right hand (rear brake) and only use the front brake for added braking power if necessary. This made me wonder why there wasn't a braking system for a bike that actuates both front and rear brakes from a single grip alleviating novice operators from having to guesstimate how much braking force they are applying with front and rear separately. 

I wanted to ride just behind Sandy. But, the guides have a different way of doing business. They put all the women ahead of all the men in reverse order of size/weight. One guide descends ahead of the group on a bike while the other is driving a van at the back. They expect us to maintain our order of position with about 30 feet spacing all the way down. I understand their reasoning. With the heaviest at the back, they have better control over speed of descent.

They have each of us do a short, 100 meter test coast to prove we can ride a bike and bring it to a stop safely. Sandy's test ride went fine. Then, we start our descent. I am second from the back. The rider just ahead is the man who is celebrating his 30th anniversary and hasn't been on a bike in more than 20 years. We're doing between 15-25 mph. For the first few minutes I am keeping my eye on Sandy several riders ahead of me. She looks rock solid. But, I notice the guy just ahead of me has a minor front wheel wobble every now and then. It never enters my conscious attention enough to say anything to him.

After another minute or two go by, I take notice of his wheel wobble again. It seems a bit worse than before. All of the sudden, in the space of 3-5 seconds, it goes from being minor to downright dangerous. "Brake! Brake! I yell out." But, I don't think he hears me. He crosses over the double yellow line into the opposing lane. Fortunately, there is no car traffic from either direction. The wobble worsens. It is out of control. At the last moment, just before he goes off the left edge of the road into a wall of sharp volcanic rock, he is thrown from the bike onto his side on the pavement. It looked awful!

I pedal over to help him. Just as quickly as he falls, he stands back up. "Are you ok?", I ask. "Yeah, I am ok." He is in shock and probably embarrassed. I don't think he is thinking straight. What I saw looked terribly painful. I really want him to take a seat on the shoulder of the road. But, he's got a gash in his left elbow that's bleeding badly. I think I see bone. He will need stitches. And, he's got road rash on his side and leg.

In the few days following the ride, Sandy and I recount all the ways in which it could have been much, much worse. When he went over the double yellow, there could have been oncoming traffic. He could have gone completely off the road into the jagged volcanic rack instead of staying on the pavement. He could have gone off the outside edge of the road and down the steep sides.

I don't think there was any problem with his bike. It was cold. And, I believe he was shivering a bit on the descent. Having not ridden a bike in many, many years, I also believe he was probably gripping the handlebars very tightly. That combination of things is almost verbatim what the last paragraph in this post on Sheldon Brown's site regarding causes of front wheel shimmy describes.

Witnessing his fall shakes me up a bit. Our group stays on the side of the road for 20 minutes while he gets some first aid. A passing bus stops to take him and his wife down to the hospital. While waiting, I talk with Sandy and inspect her bike quickly. I ask if she has been feeling any wheel wobble. I suggest to her that if she does, she should immediately brake and slow to a stop.

Our group gets going again. But, we're all a little shaken up and descending very timidly. A large gap starts forming between Sandy and the first two riders and guide at the front. Sandy now takes tight turns very slowly. Eventually, the guide decides to put Sandy in remedial downhill and asks her to change position in line to right behind him.


We stop for a short breakfast at a lavender farm. It was gorgeous. The weather was just awesome. And, the breakfast sandwich was excellent. We all finish the descent safely down to about 3,000 feet. Then, we pull off to the side to get back in the van for the ride back to the hotel.

Sandy enjoyed her experience descending Haleakala. But, we both decided it wasn't worth what we paid for it and we probably would have enjoyed it just as much and been just as safe if we had planned it all ourselves.

Friday, September 5, 2014

Bunions Shmunions

Look at my feet...


My right foot has a pretty pronounced bunion.

Personally, I think this demonstrates I am further evolved than other people who don't have bunions because my feet appear to be developing the same opposable thumb that my hands were born with ;).

In all seriousness though, bunions can be a pain, in more ways than one. This is espcially true for a grinder-type cyclist like me. So, I've had to manage the problem for many years now. In the last several years, I've taken it more seriously.

This is partly because of my 75 year old mother's feet. Men often inheret a number of their genetic tendencies from their mothers. My mother has had major problems with her feet. She has bad bunions in both feet. She's had pins inserted in several of her toes, she's had a festering infection in one of her big toes that took months to heal (or is it heel?). She's had her achilles tendon's lengthened (they make cuts not quite all the way through the tendon. Large gaps form where the tendons are cut but the tendon regrows to fill those gaps, thereby lengthening the tendons). After all of these procedures, my mother has experienced only marginal improvement in her feet. She frequently still has pain and is less able to walk long distances or at her typical fast pace.

I think my bunion started developing as early as high school. I ran cross country and track in high school. I've noticed my big toe had a funny shape to it even back then. And, sometimes the main joint at the ball of my foot would hurt. I continued running in college but gave up running in my early twenties for the bike. But, now in my fifties, I've recently started picking up running again. But, so far, I've been doing it all on a treadmill. At any rate, I've noticed the bunion is more pronounced than it once was and am worried I am heading for the same problems my mother is having.

So, I am in the market for ways to halt the progression of my bunion. I don't think it can be reversed. At least not without surgical help. And, my understanding from my PCP is that surgery doesn't too often fix the problem.

Numb Toes

Up until about 2011, I rode in tennis shoes with platform pedals and toe straps. It worked fine. But, caving to peer pressure and the belief that clipless pedals would improve my efficiency (or speed), I switched to Look pedals and a pair of $150 Specialized shoes. 

In the new shoes and pedals, after 2-3 hours of riding, my toes were going numb. I tried all sorts of remedies. I removed the basic orthodic inserts that came with the shoes and replaced them with several different kinds of orthodics including SuperFeet (the orange ones). I tried pronation and supronation wedges. I tried different thickness of sox and even orthopedic sox. All of these remedies helped to a minor degree but didn't really solve the problem. Eventually, on longer rides, no matter what I tried, my toes would go numb.

I went back to platform pedals temporarily to see if the numb toes would go away. They did! But, I was  stubornly committed to clipless pedals at this point. I concluded that the reason platform pedals worked is that they allowed the ball of my foot to move out over and in front of the pedal spindle. I wanted to see if I could achieve the same pedal/foot geometry with my clipless pedals.

However, the bolt pattern on the bottom of most shoes to support 3-bolt cleats like Look's do not permit enough fore/aft adjustment of the cleat for me to get the ball of my foot out in front of the pedal spindle. What to do?

I decided to drill new holes in the bottom of my $150.00 shoes (more about the details of that in a later post). I moved the cleat back on the bottom of the shoe almost 1/2 an inch. It worked! The balls of my feet now extend just ahead of the pedal spindles. My toes no longer go numb on long rides. The only problem is that I now have a slight toe overlap with the front wheel which I need to be cognizant of when making turns tight enough to cause the trailing edge of my front wheel to steer outside my pedals.


From the picture above, you can just barely see the original bolt holes now partly obscrued by the cleat attached in the new holes.

Third Party or Custom Insoles

The insoles that come standard with Specialized shoes are not very good. Specialized also sells a few different kinds of higher quality replacement insoles. I've tried those and several different kinds of third party insoles including SuperFeet, Dr. Schoals and Spenco. I usually have to do a 3-4 hour ride several times before I'm sure a particular product is or is not working for me. So, once I settle on a product, I tend not to want to change it. I settled on Spenco Full Lenght Orthotic Arch Supports together with metatarsal pads pictured below.


You will notice the arch support involves a solid plastic support component. It is a very strong arch support but weights a tad more than most people may be willing to tolerate too in their cycling shoes. I don't mind it at all given the comfort and support it provides.

Bunion Releif

There are a number of products out their to provide bunion releif. Many of these are designed simply to cushion the area around the bunion. I don't recommend these because they don't actually do anything to address the problem. They only address the symptoms of the problem. The symptoms are typically pain around the area of the bunion or perhaps added pressure against the skin due to the bunion pressing against the wall of the shoe.

The product that has helped my bunion problems the most is a metatarsal pad. It is a bit counter-intuitive though. You can see it as the white ovular pad in the upper part of my insole on the picture above. It actually isn't designed so much to pad anything as it is to lift something. It is designed to lift the part of the foot just behind where all the toes (metatarsals) connect. You can get pads in different thicknesses to achieve different amounts of lift. Lifting the region of the foot where the metatarsals connect takes pressure off the ball joint of the foot.

After ignoring my bunion for several years, I had lost most of the feeling on the outer edge of my big toe. I lived with it like this for several years. But, after using metatarsal pads for less than a few months, all of the feeling came back to my big toe and pain in my ball joint when away as well. I was stunned how effective these pads were.

However, when I first saw a podiatrist, he didn't take the time to explain to me proper installation of a metatarsal pad. So, when I first used them, I didn't have them installed correctly and they didn't offer me much relief. It is just very important that you place the pad so its leading edge matches the ridge where all your toes connect.

Finally, I would recommend felt as opposed to foam pads. There are a couple of problems with foam pads. First, they don't last me more than a week. So, I have to continually replace them. Thats fine. You can purchase 100 pairs of pad on Amazon for around $20.00. But, they are hard to remove due to the adhesive necessary to keep them in place. A second problem with foam pads is that they create a lot of friction with your sox. So, as you try to slide your feet in or out of your shoes, the pads grab your sox and wind up forming wrinkle ridges in your sox under you feet. Or, you can sometimes wind up peeling off a part of the pad as you slide your foot in and out of your shoe. Felt pads last much, much longer and your sox can slide over them much more easily.

Sunday, July 13, 2014

Aero Bars and Group Riding

The following is a post written by Mike Monk, also known as the Bama Cyclistback in 2011. Mike was our tour leader for my 2013 cross-country tour. He has lead many tours for America By Bicycle all over the country and has crossed the country on bike, many, many, many times. I learned a lot from him and really respect his views on cycling safety. I asked his permission to post some of his advice regarding safe cycling.

Mike Monk on Aero Bars in Groups

Aerobars give us the ability to go at least 2 mph faster when we are riding alone. There's no doubt that aero bars have their place in cycling.  But there are times when they need to be avoided like the plague.

I'm sure that if you have been to any group rides you have witnessed people in the group riding on their aero bars.  Now it's not against the "cycling law" to show up with aero bars on a group ride. But it is against all good common sense and safety standards to "use" them around other riders.


Many people ride so much on aero bars that they do it without even thinking and feel that it's the most comfortable way for them to ride. That maybe so, but it's also the most unstable position in which to ride a bike.  Some also say that they always leave plenty of room when they are on the bars.  They may. But it takes only a second for all that room to disappear in an emergency and you can't get from your elbows to a position of greater control in time to save yourself and everyone else around you.

The main purpose for aero bars is aerodynamics.  This being the case, you don't even need them in a group because you get more aerodynamic effect from the other riders than you do from aero bars.  Besides, there are lots of problems you can run into by using them in a group ride.  One main problem is that a rider on aero bars is not as stable as one on regular bars.  Of course some are more stable than others. There are indeed some people who are very steady on aero equipment. But no one can argue that a rider can assert greater control authority over her bike with her elbows than she can with her hands.


Another problem with the aero position is that your hands are far away from the brakes.  Now you may say that's an advantage since you shouldn't brake in a group anyway.  While this is basically true, there are times when slight speed adjustments are necessary. 
 When the group comes to a stop or approaches a turn there will be a time when the aero bar rider has to transition to the handle bars to brake and/or turn.  There's really no good time to do that in close proximity to other riders let alone when the group is changing speeds and/or direction. Worse, in emergency situations, the time to come off the bars to reach the brakes is way too long.

The last point I'll make is that IF one uses aero equipment in a group, it should only be used if that person is pulling at the front (I'm not really convinced that's even a good idea, but at the front you are less likely to hit someone's rear wheel and cause an accident).  Resist the urge to stay on them after you break off the front and start riding adjacent to or behind anyone.  Believe me, it won't take long for everyone in the pack to forget how they were impressed when you pulled strong and only remember you as someone they don't want to ever ride with again if you disregard their safety when you are not at the front.

When you are riding in a group, you should have confidence that everyone is riding for the good of the group and that no one will behave in such a manner as to put the group in danger.  Aero bars are good things...but they have their place.  Use them as designed...as an aid to going fast when you are alone or doing a time trial event.  They really have no place when riding with a group.


Saturday, July 5, 2014

Sun Protection

I decided to write about sun protection because I have spent a lot of time thinking about and dealing with it and it occurred to me others might like to know what I've learned.

Basal Carcinomas

Before I turned 50, I had already had several basal carcinomas removed from my head. A basil carcinoma is a kind of skin cancer. Caught early, it is easily treated. My doctor tells me they are more than likely related to sun burns I received when I was a child. But, he also explained that I need to protect my skin from further exposure. Many of these can be treated by "burning" them off with liquid nitrogen, a procedure I have had done on my (bald) head several times now. But, others are bigger and involve more work to remove.

The first I had was a large, cyst-like nodule on the back of my neck. It wasn't painful, just annoying. Removing it was a simple procedure my primary care doctor handled during my office visit. He numbed it with Lidocain, cut it out, put in several stitches and sent it to the lab to confirm he removed all of it -- which he did. I had it removed the day before the 2011 Davis Double Century. I remember being at the lunch rest stop and several riders pointing out the stitches in the back of my neck. So, I made up a story and told them I had been in a crash earlier in the day and had to stitch myself back up to complete the ride ;)

The second I had removed was from the side of my face, near my left temple. Because it was on the face which involves more delicate skin and where we like to avoid scaring, they use a different procedure called Mohs Surgery. The doctor I was referred to had performed thousands of these procedures. He saw me once for a consult and then scheduled the procedure.

The procedure is iterative. The doctor removes some flesh and immediately checks the "margins" to see if he removed enough. If not, he removes more and tests it again. He keeps doing this; removing some flesh and testing its margins, until he's certain he's removed all of the cancer. Because it takes time to test each sample, while one sample is being tested, the doctor moves to other patients.

In fact, the doctor was juggling 5 of us the morning I had mine removed. Between "cuts", each of us would return to a waiting area with a temporary bandage over the surgery site while he moved on to the next one. It was amazingly fast and efficient. It took the doctor 3 tries to remove all my cancer. I briefly saw the site before they stitched it up. I was amazed how large a hole he had carved in the side of my face! You could have fit the tip of my thumb in it. But the cancer was gone and that was a blessing.

Because of all of the issues with the skin on my head over the last few years, I now take sun protection a lot more seriously, especially because I can wind up spending so many hours in the sun while cycling. On double century rides, I am out in the sun for more than 12 hours.

Sunscreen

Sunscreen is a must. I didn't always wear it if It was only going to be out for an hour or if I was going to be out only really early or late in the day. Now, I wear sunscreen whenever I am on my bike, even for a full moon night ride ;) Before I used to have a pretty strong tan by the end of the summer season of cycling. Now, my skin stays about the same fair/white complexion throughout the year.

But, it has been my experience that different kinds of sunscreen effect my body's ability to sweat properly. For a long time I used a spray-on type sunscreen I was happy with. But, Costco stopped carrying that brand and so I switched to another brand. It was an oil based lotion. And, I immediately noticed that I felt hotter on hot day rides. I concluded my skin wasn't sweating as well because the sunscreen was clogging my pours. I did some reading about this on line and decided to find a water-based brand. I finally settled on Coppertone Water Babies Sunscreen Lotion, SPF 50.


Not only is this a water based lotion but it includes zinc-oxide. Zinc-oxide is by far the best possible sun protection available. This sunscreen is a high SPF (50), is fragrance free and is water resistant so it will not easily sweat off or run down into your eyes. I have used this sunscreen for several years now and am very happy with it. In fact, the only downside I can see is that it is somewhat difficult to wash off in the shower after a short, less than 2 hour, ride.

Finally, you should think about putting sunscreen on about 20-30 minutes before you actually go outside. It takes about that long for it to activate. And, you should re-apply sunscreen every couple of hours.

Sunscreen Specifically for the Lips

On my 2013 cross-country tour, I was out in the sun and wind for hours, day after day for more than 30 days. That is really, really drying to the skin and especially the lips. In fact, one of the riders on our tour had to abandon his 2012 attempt mid-way through due to pain and complications from drying lips. So, my wife found me an excellent product made specifically for the lips. 


I apply this to my lips at every rest stop on a long ride. The tin is small enough to keep in your tool bag so it is very convenient. You can use it for your nose and whole face too. It also has zinc-oxide.

Sun Clothing

My wife shopped for and found some very nice sun protective clothing. One item I just swear by now is a sort of bonnet that covers my whole head, sides of my face and neck. 


It is made by Solumbra/Coolibar. However, I don't wear it exactly the way it was intended. Instead of pulling it around my face and over my nose and mouth, as is shown in this picture, I bring the velcro closure together under my chin. Even on really hot days, it is comfortable. However, on climbs where my speed is lower and so less air is moving over my body, it does wind up keeping a little too much heat in. I will undue the closure under my chin and let it hang free behind my neck. It would be better if it zippered or laced so I could re-close it without stopping after going over a summit.

In addition to covering my head, I wear a light weight, loose fitting, long sleeve shirt. The problem with many "UPF" and "Fitness" shirts for cycling is that none have those nice pockets we have in our jerseys. So, I wind up wearing a cycling jersey or very light cycling vest over it, pictured below.


This is not a tight fitting shirt like Under Armor would be. However, that too provides excellent sun protection. The main thing you want is a tight weave. As far as sun protection goes, think of the difference between a picket fence and a privacy fence. The picket fence obviously lets prying eyes see through. So it goes with sun protection of woven garments.

Color really doesn't matter. Black will provide comparable sun protection to white. In fact, I've read that darker colors may actually provide more sun protection than lighter colors. But, darker colors absorb more thermal energy instead of reflecting it. That means a darker garment feels hotter on the skin. I've also read that tighter fitting may actually improve sun protection over a looser fitting garment. That may be because the weaves of tight fitting garments have to be very tight themselves.

If you are concerned or unsure about how much sun protection your existing clothing provides, you can always specifically shop for clothing with a "UPF" rating. Apparently, there are also fabric "treatments" you can apply to existing garments to enhance their UPF rating. However, I myself am inclined to believe UPF ratings for normal fitness garments are more of a sales gimmick than anything else. You'll pay more without any real added benefit. 

Finally, from the picture above, you see I don't wear any sun protective garments on my legs. I do put a lot of sunscreen on them but my legs are also protected by a lot of hair and the fact that their orientation to the sun is a lot less direct. And, they are often shaded by my torso. In all my years of riding, I have only ever experienced too much sun exposure on my legs on a handful of occasions on early morning rides where I forgot to apply sunscreen.

Eyewear

I guess no article about sun protection for cyclists would be complete without talking about eyewear. By now, we probably all know about UVA and UVB rays. There is a lot of good eyewear available today that protects against UVA and UVB rays. However, I tend to look for eyewear that asserts it meets the ANSI Z80.3-2001 (which was apparently updated to ANSI Z80.3-2010) standard for UVA/UVB protection. I have used Serengeti Drivers while driving for years. Serengeti makes a great, very light weight, break resistant pair of sun glasses, Serengeti Nuvino, that you can get at Costo for under $70.00.

Friday, June 27, 2014

Just Ride

So, I just finished reading Grant Peterson's Just Ride. Its an easy read, filled with a lot of wisdom about how to maintain a practical attitude towards riding your bike. I would say "…towards cycling..." but somehow I think Grant might agree "cycling" sounds too much like a racer's term ;). I really liked the book and do recommend it.

However, be forewarned that if you're the kind of rider that frets over grams of additional weight, wouldn't be caught dead riding platform pedals and toe straps or frequently monitors how your performance measures up on Strava or Garmin segments, you will likely not enjoy Just Ride as much as I did.

Grant Peterson is the founder of Rivendell Bicycle Works in Walnut Creek, California. Grant designed the frame I now ride, the Soma San Marcos, in collaboration with Soma Fabrications. I found that reading Just Ride was a little like reading the brochure on the San Marcos. I pretty much bought the San Marcos from that brochure alone without even so much as a test ride. Everything I read there suggested whoever designed that bike, which at the time I didn't realize was Grant Peterson, had a kind of mind share with me. They thought about bikes and cycling the way I did.

So, it was quite a welcome surprise to discover this gem of a book Grant wrote back in 2012. One overriding sense I had from reading it is that I no longer feel so much alone in the way "mainstream" cycling often appears completely absurd to me. Yet I fully participate in that absurdity.

Take my last ride for example. From the time I decided I wanted to ride to the time I was actually on my bike pedaling was about a 20-30 min ordeal. First, I have to take off all my (street) clothes and put on my HR strap; then, my cycling shorts, cycling jersey and cycling sox. Its all tight fitting lycra because we've all been told "cotton is rotten." Then, I have to fill my jersey pockets; left with id, health insurance card, credit card, cash, keys to house and cell phone, middle with clear lens glasses (because I will be out past dusk) and spare batteries for lights, right with gel packs, stinger wafers and ecaps Then, sun screen on my head, ears and face and arms. Then, I have to unplug my rechargeable lights and bike computer and put them on my bike. Then, I have to fill 2-4 water bottles and pump up the tires to 100 psi.

About this time through the process, if I happen to be wearing overall shorts, I invariably wind up realizing just then that I need to use the restroom; most likely a #2. Because my jersey doesn't unzip all the way down, I have to work it over my head without spilling the contents of my pockets and having it all fall into the toilet.

Finally, I am ready to put on my shoes. They are the most expensive shoes I own but I can't really walk in them. I can't use them for anything else but riding. And, shortly after I bought them, I had to drill holes in the bottom to move the cleat far enough back that my toes would stop going numb. Lastly, I put on my helmet and gloves and finally, after about 30 minutes of prep, I am ready to ride.

And, when I get back from my ride, I have to rush to the frig and down a protein shake because the first 30 minutes after completing a workout is when your body maximizes its protein uptake and that is important to re-build muscle (from all the damage you did during the ride).

It is these absurdities and many others that Grant Peterson raises our awareness of and offers more sensible alternatives to in Just Ride. Don't get me wrong. I like to challenge myself with difficult rides. I like to train myself up for them and I like to improve my "mastery" of cycling. But, Just Ride helps to remind all of us that we can wind up too often taking things a bit too far.

Except for two chapters of Just Ride, one on helmets and the other on target fixation, I either agreed wholeheartedly with Grant's perspectives or at least have found myself asking some of the same questions. So, using Grant's terminology, I guess as I have aged I have become a bit of an Unracer at heart.

But, it hasn't always been that way. Worse, I don't honestly know if I am an Unracer today because of a conscious choice (a dawning of wisdom with age maybe) to be that way or because I am really a wanna-be Racer who just doesn't have the legs ;)

I was surprised one topic Grant did not cover in Just Ride; sun protection. Having had 2 basal carcinomas removed before I was 50, I take sun protection very seriously now. Regardless of how hot it is, I typically wear long sleeve shirts designed specifically for sun protection as well as a sort of bonette underneath my helmet that completely covers my head and neck.

Helmets

Grant makes some good points regarding bike helmets. They really do not provide as much protection as we wish or might like to believe. Also, testing protocols don't faithfully represent real-world usage.

But, I disagree with Grant that the simple act of just dawning a helmet causes a rider to think s/he is that much safer for it and, in turn, will take more risks because the helmet is the for added safety. Honestly, I think most riders like to avoid any situation where they would actually need a helmet.

And, I cannot agree with Grant at all that its conceivable to be safer to ride without a helmet and simply pay more attention or adjust your riding behavior in other ways that reduce risk to compensate. About the only way I think that could be true is if you simply do not get on the bike to begin with. In that case, then yes, I'd agree you probably don't need the helmet either.

Rear Blinkers

Another point Grant makes in Just Ride is a blinking taillight can cause approaching (impaired) motorists to fixate on the dazzling light. Its called Target Fixation. Instead of warning them off, a blinking light draws them right to you and they crash into you. So goes the target fixation theory. In Just Ride, Grant writes that the phenomenon of target fixation is a good reason to use a steady light instead of a blinking one.

Now, if you believe the target fixation arguments and the only reason you use a blinking light is to save battery power, then why take the risk for the sake of some additional batteries? This is Grant's point and I agree -- that is if you believe the target fixation argument.

I myself am still not convinced that target fixation (the kind where a blinking light draws a motorist to crash into you) is a real or significant risk. There is really no evidence other than anecdotal.

I believe more visibility for a cyclist is always better. And, I believe a blinking light is more visible to motorists than a steady one. I also believe there is no such thing as a bike taillight that is too bright. I use a taillight in daylight riding as well.

So, I think you have to weigh the risks of reduced visibility (e.g. going with a steady light instead of a blinking one) against the risks of a motorist becoming fixated on your light. I think reduced visibility is the bigger risk. Nonetheless, I'd really like to see some more research on this issue. Maybe that's a good topic for a future blog post.

Biking is supposed to be Fun

I enjoyed reading Just Ride and found myself laughing with Grant through many of his comical observations of the influence of racing on the rest of us. At times, some of his commentary comes across a bit on the preachy side. Nonetheless, more often than not, I found myself nodding and wishing most of my riding friends shared the same opinions. In fact, I plan on giving this book to a few of my Racer oriented friends.

A final comment to leave you with is that if you've ever found yourself feeling burned out from cycling, Just Ride might have the cure. Its a friendly reminder that biking is supposed to be fun. With often comical descriptions, Just Ride helps us come to our senses about all things cycling.

Thursday, June 19, 2014

Grinding vs. Spinning

In a previous post, I offered a hugely simplified potential energy analysis to determine a lower bound on the amount of power draw on my body on a recent climb.

The model consisted of two parts. The first was the potential energy of moving the mass of bike+rider up a hill. The second was the potential energy involved in moving the mass of the legs around and around on the cranks. Using these, I computed 198 Watts for the mass up a hill part and 46.44 Watts for the legs moving around on the cranks (at a 55 rpm cadence) part.

Here, I am curious about what this model might say about relative power draw for the same climb and same rate of climb except with variations in cadence. What if I climbed at the same rate but geared for a cadence of 60 rpms, 70, 80 or 90? What is the difference in power draw and how large a fraction of the total does the moving legs part become?

Using the same appraoch explained in a previous post, I've computed and tabluated the results below.

Tabulation of power due to two separate contributions; moving mass up a hill
and mass of legs in motion around cranks and as a percentage of the total.
This is based on same climb and speed of climb but just differnt gearings.
Climbers are often classified into two types; grinders and spinners. Grinders, like Jan Ulrich, opt for lower cadences on climbs, often below 60 rpms. Spinners, like Lance Armstrong, go for higher cadences, often above 85. All other things being equal though, there is a price to pay for that. A spinner at 90 rpms will draw more power just to keep the mass of his/her legs in motion at a higher cadence. In my example, the power difference is a tad over 30 additional watts. Another way to think about this is that each additional rpm requires approximately one additional watt of power from my body.

What this means for you, the rider, is that your cardio system is going to be working that much harder to accomodate the extra power draw due to your faster moving legs. But, your leg muscles and feet will have a bit of an easier go of it because although they contract more often they don't have to contract as forcefully and the pedal pressure is lower. So, this is a way in which you have some ability to tradeoff cardio capacity for muscular strength during a ride. By shifting to lower gears and spinning more, we place more load on our cardio system but lessen the load on our leg muscles and feet and vice versa.

For me and for most people I think, higher total power draw means higher heart rates too. I like to do whatever I can to keep my heart rate as low as practical. So, I tend to favor grinding. But, eventually, my leg muscles simply tire of the forceful contractions and I have no choice but to reduce gears and spin more or, more likely, reduce speed.

That suggests to me why spinning has more or less become the adopted standard among most elite racers. Late in a ride, after a lot of grinding, the leg muscles become deeply fatigued, unable to either contract with the same force or contract more frequently. Your only option is to reduce speed. However, spinning doesn't result in the same depth of fatigue in the leg muscles. Because it's placing more load on the cardio system your legs muscles can continue contracting at the same rate for longer.

If you can train yourself to master both grinding and spinning styles of riding, you give yourself an option to distribute the load on your body a bit depending on how you are feeling during a ride.

Sunday, June 15, 2014

Pencil and Paper Power Estimates

I've never owned a power meter. But, I've always been curious how much power I produce on any given ride.

A great resource that motivated some of the analysis here is Bicycling Science. That book is just full of really interesting analyses, simplified models and equations related to cycling. If you're a cyclist that just happens also to be an engineering or math nut, you'll love it.

With some simple measurements, it is possible to use a basic potential energy analysis to compute a lower bound on the amount of power draw on the body for a given climb.

Its easiest to do this with a moderately long climb of nearly constant gradient. For riders in Livermore area, a good climb for this purpose is Del Valle. It is about a 1.6 mile climb of roughly constant 7.3% gradient. Some Garmin data for one of my rides up it is pictured below.

Elevation profile and ride data for Del Valle climb

Rider + Bike, Force through a Distance

The combined weight of my body plus my bike is about 200 lbs or 90.72 kg.

In the picture above, you can see it took me 14:03 to climb from an elevation of 768 feet (234.1 meters) to an elevation of 1385 feet (422.1 meters). That's a change in elevation of 188 meters in 843 seconds.

Now, potential energy is force through a distance. So, I need to know how much force my body + bike exerts in Earth's gravitational field. To get that I multiply the mass, 90.72 kg, times Earth's gravitational constant of 9.8 m/s/s yielding = 889 Newtons.

So, for the this climb, the total potential energy realized is 188 m * 889 N = 167132 Joules. Since this potential energy was realized over a period of time of 843 seconds, the power output was 167132 J / 843 s = 198 Watts.

Now, that is a lower bound on my power output. My actual power output was very likely a bit higher due to a number of losses including overcoming wind, flexing of components in the bike as well as other biological activities of my body such as breathing, heart pumping, sweating, shifting around on the bike, etc. Most important though, it does not include the power involved in simply moving the mass of my legs around on the cranks.

Power due to Moving Legs

To compute an estimate of the amount of power required simply to move the mass of my legs around the cranks, we need to know how much my legs weigh, how long they are, how long my cranks are and how fast I was turning the cranks.

My Garmin data also gives me cadence information and so I know during this climb I averaged about 55 rpms on the cranks.

But, short of cutting my legs off and weighing them, how do I compute how much my legs weigh? In particular, I need to know how much my upper and lower legs weigh and how long each is individually. Turns out De Leva (1996) has tabulated a statistical average for both weight and length of all limbs for a large population of men and women as percentages of there overall weight and height (I wonder if this data is somewhat skewed by the trend towards obesity in the average population).

Next, we need a very simplified model for the mechanical system representing my upper leg, lower leg, foot, and crank arms. To really simplify things, I have decided to actually decompose the leg motion into two parts we can superimpose (e.g. add) to compute a total power. This simplified model is surely not an accurate depiction of a real pedaling motion. But, its close enough for purposes of this power estimate.
Simplified mechanical model for moving legs while pedaling. The motion is decomposed into
two parts; one for the upper leg, rotating about the hip and one for the lower leg going straight
up and down above the pedal.

Power due to lower leg motion

In this simplified model, the lower leg moves straight up and down a distance equal to twice the crank length. On my bike, the cranks are 175mm. So, the total distance the lower leg in this model moves is 350mm. Next, in this potential energy analysis, we are concerned only with the part of the motion that works against gravity. Now, based on my weight of 180 lbs (81.65 kg), using De Leva's tables, my lower leg (shank + foot) weighs about 5.7% of my total weight or 4.65 kg. Again, we really need the force of the weight of my leg, so we need to multiply it by the gravitational constant, 9.8 m/s/s. So, the force of weight of my leg is 4.65 kg * 9.8 m/s/s = 45.57 Newtons.

So, the potential energy gain on the up-stroke of the crank is 0.35 m * 45.57 = 15.95 Joules. Next, at a cadence of 55 rpms, this potential energy gain happens 55 times in 60 seconds yielding a power output of 15.95 * 55 / 60 = 14.62 Watts. But, that is for just one of the two legs turning the cranks. So, the total power from keeping the lower legs in motion is 14.62 * 2 = 29.24 Watts.

Power due to upper leg motion

For the upper leg, one end is moving while the other end rotates around the fixed hip joint. The upper leg moves from almost vertical to almost horizontal, say between 70 degrees and 20 degrees relative to the horizontal. 

Near the bottom of the stroke, the amount of force required to rotate the free end of the upper leg is near zero because the motion is almost perpendicular to the direction of gravity. Near the top of the stroke, the opposite is true. Some simple statics equilibrium analysis should yield the forces involved.

For any given angle, in a statics equilibrium analysis, the sum of the forces is equal to zero and the sum of the moments is equal to zero. The only downward force is due to gravity which we can apply in our model at the center of the leg length. The motive force to move the leg is simply to overcome gravity. For any given angle, theta, the force F I think is 1/2*{leg force}*cos(theta). It is near zero at the bottom of the pedal stroke because the upper leg is just about hanging from the hip joint. It is near 1/2 the leg’s weight near the top of the pedal stroke.

To compute the total work in moving the leg, I believe the right answer is to integrate 1/2*{leg force}*cos(x)dx for x=0…pi/2. The result is 1/2*{leg force}*1/2(pi-2)*{length of leg}.

Using de Leva’s data, the upper leg is 14.16% of total body weight. So, for me at 180 lbs, the upper leg weighs 25.49 lbs (11.56 kg). Again, to get the force of the weight of my leg, we multiple by the gravitational constant yielding 11.56 * 9.8 m/s/s = 113.3 Newtons. Next, my upper leg length is about 2.4 feet or 0.732 meters

So, for one leg, we get a total work of 1/2 * 113.3 * 1/2 *(pi-2) * 0.732 meters = 9.34 joules. Again, for my cadence on this climb, this leg motion happens 55 times in 60 seconds. So, the total power is 2 * 9.34 * 55 / 60 = 17.2 Watts


Total power estimate for the climb

In this very simplified model for leg motion, we simply add the power contributions from both the upper and lower leg motions and arrive at 29.24 + 17.2 = 46.44 Watts.

So, the total power estimate for this climb is 198 + 46.44 = 244.44 Watts.

Although I don't ride with a power meter, I have done a little bit of time on a friend's CompuTrainer configured to impose resistence equivalent to powers in the range of 200-350 watts. On the trainer, 250 Watts felt like the kind of resistance I am accustomed to on a moderate length and gradient climb such as the one analyized here. So, that some emperical evidence to suggest the analysis here may yield a decent estimate of power.

It would be nice to be able to include power due to overcoming wind. In this case, since I was on a climb, my speed really wasn't very high. Going through still air at that speed there just isn't that much resistence due to wind. But, in a later post, I'd like to investigate a similar power estimate for my size (frontal area) to overcome wind drag while on a flat course at a higher speed.

A final disclaimer

This analysis is not aimed at computing a measurment similar to what you would get with a PowerTap power meter. A PowerTap power meter measures the power actually produced by your work at the rear hub. This analysis is aimed more or less at the power draw on your body. So, I think this means that this analysis is likely to yield a higher number than you might see from your PowerTap. On the other hand, this analysis, because it is using a basic potential energy model, is neglecting to include a number of factors (flexing, compression/expansion and even heating of bike and body components, etc) that add to the power output. That means, that this analysis represents a lower bound on the power draw on your body.