Sunday, November 1, 2015

Troublesome, Recurring and Slow Leak Flats

I've had a few experiences with recurring flats. After spending 20+ minutes on the side of the road and not finding the cause of the flat, I'd shrug, replace the tube and have a flat soon again.

These aren't catastrophic blowouts. You don't hear air escaping. It isn't like everything is fine one moment and the next the tire is flat. Eventually, the bike just starts to feel sluggish and handle poorly. These are slow leak flats. That means teeny tiny holes.

Ordinarily, after replacing two brand new tubes and having them go flat, the simplest thing to do next is replace the tire also. But, I ride Continental Grand Prix 4 Season 25 mm tires. They are great tires. They often last more than 3,000 miles without a single flat! And, these miles were on roads I've ridden over many times before with other brands of tires and fairly routinely wound up getting flats.

So, I like these tires a lot. I've had good success with Specialized Armadillo tires too. But, the Continental Grand Prixs handle quite a bit better too. They also cost more than my car tires; $50-65. So, just replacing one because I can't find the cause of a flat isn't a great solution. At any rate, unless you happen to also carry an extra tire on your rides (I often do), replacing the tire is only an option if you happen to flat within walking distance of bike shop.

Finding the Cause of the Slow Leak Flat while on the Side of the Road

Even before you remove the tire from the rim, take a good visual inspection of the tire and then also run your fingers over it, both the main tread and sidewalls taking care to avoid cutting your fingers with any sharp debris that may be protruding from the tire. Sometimes you will find a tiny bit of metal but that is obviously not the cause of the flat because it isn't poking all the way through the tire. Sometimes, you will find nothing on the exterior surface of the tire because its actually embedded itself within in the tread.

If you're lucky, you've only spent a few minutes looking for the cause of the flat and can now confidently replace your tube knowing you've corrected the problem. However, if you didn't find the cause from inspecting the exterior of the tire, in all likelihood the problem is small bit of metal on the inner surface of the road side of the tire.

Next, start by removing one bead of the tire from the rim all the way around. If you are in quiet conditions where you could potentially hear air escaping from a small leak, it might be possible to inflate it a bit and then listen for air escaping. Alternatively, you can to remove the tire completely from the rim but keeping the tube and tire fixed in their relative positions and try inflating and listening for the leak that way. If you can narrow in on the leak by listening for escaping air, this helps to find the section of the tire where the problem is and you can mark it with some scratches on the tire surface. 

Next, you can remove the tube from the tire but do so in such a way that you can remember (approximately) their relative positions. Inflate the tube by itself and then hold it near your ear listening for and feeling for escaping air. If you find the hole on the tube and if you remember the tube's approximate relative position to the tire, you can then identify the section of the tire where the cause of the flat must be.

Otherwise, you will have to inspect the entire inner surface of the tire as well. Its best to feel with your fingers. Curl your fingers inside the tire and slowly slide them all along the inner surface. But, be careful! If there is something sharp poking through, you can cut your fingers. Use your fingers to feel all along both the walls of the tire as well as the road-facing part. Finally, take one of the tire beads, pinch it between thumb and forefinger and run your fingers around the entire circumference of the tire. Then, do the same for the other bead.

At this point,  if you still don't have a good candidate for what is causing the flat, make another pass over the tire inner surface. This time, however, do it in sections of a few inches each. Grab a section, turn it inside out (as much as possible) and then flex the tread back and forth. Eyeball the inner and outer surfaces as you flex it and then after eyeballing, again run your fingers over the surfaces. Small bits of metal will work their way out and reveal themselves when the tire is flexed like this.

The last thing to check is the rim. Again, use your fingers and slide them all along the rim surfaces that contact the tire. Also, visually inspect all the spoke holes to make sure they are covered with rim tape and nothing sharp is possibly contacting the tube surface. If there is a problem with a spoke poking through the rim tape, you can temporarily remedy that with a few layers of paper (even paper money) or a tube patch.

If you still can't find the cause and if the leak is slow enough, then I hope you have a pump and not just CO2 cartridges. That way, you can still limp home by stopping every so often and re-inflating your tire.

Finding the cause while at Home

When you are back at home, you have one additional tool you don't usually have at the side of the road; a sink full of water. If you've tried everything described above and still can't find the cause of the flat, you can immerse sections of the whole wheel, rim, tire and tube, together in water and watch for bubbles.

However, its best to have one bead of the tire off the rim and the tube just partially inflated. If you have the tire wholly on the rim and the tube fully inflated, escaping air often travels along the rim to the valve stem hole where it escapes to form bubbles leaving the false impression that the cause of the flat is at the valve stem. So, remove one bead of the tire from the rim and partially inflate the tube. Then immerse sections of the wheel in water and watch for bubbles. Wherever the bubbles are, you are near the section where the cause of the flat is. Mark it with a Sharpie, then remove the tire and start looking at it with a fine tooth comb. You'll find it.

On a few of occasions in the last 30 years of riding, I've had such hard to find flats. When this has happened, ultimately the problem was a tiny bit of metal wire embedded in the tire tread such as you see at the end of the pliers in the picture below.


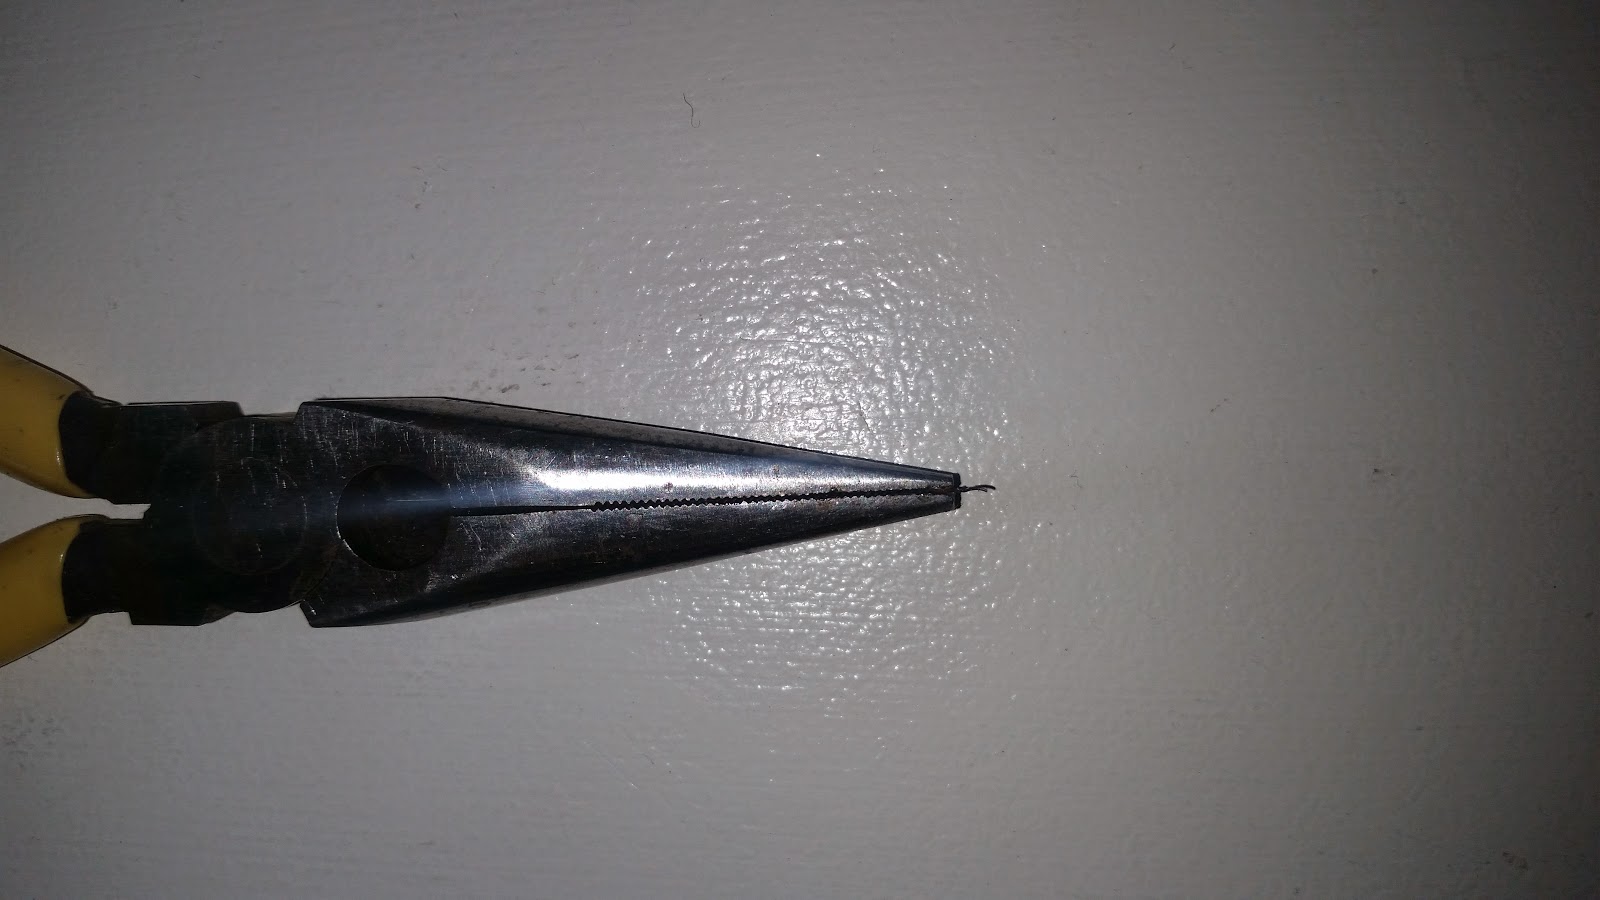
It'd be a shame to toss out an otherwise perfectly fine $50 tire due to such a small bit of metal!

Saturday, October 31, 2015

Sydney's Face on a Pumpkin

I've been riding but not writing. I haven't had much to say. But, its Halloween today and I wanted to carve a pumpkin for my grand-niece, Sydney with her face on it.

Years ago, I saw an episode of Rosanne and at the end of the episode they had all these cool pumpkins, real pumpkins, carved with the faces of the actors. They were phenomenal. You can see one on the cover of the DVD of the Rosanne Show Halloween specials.


I wondered if I could do that same thing. So, a long while back I tried doing a pumpkin of my wife's face. I didn't have a good camera to take a picture of it at the time. So, video taped it.


This is a VHS video of it illuminated by a small candle. Its the only proof I have that I once did it.

Well, I wanted to try again for my grand-niece, Sydney. There is actually a fairly lengthy and detailed sequence of steps to follow starting with getting a good photograph. Then, you have to enhance it to high contrast with decent shadow contours on the subject's face. You have to avoid really fine/small details that you can't easily carve into a pumpkin. You have to select a good shaped pumpkin. You have to print the photo and transfer the pattern to a pumpkin. Finally, you have to carve the pumpkin.

The carving technique described here is the simplest. You just carve complete holes in the pumpkin. In more advanced techniques, you don't carve all the way through the pumpkin surface. You carve to various depths creating various shades of dark and light areas. That's much more technically challenging than I was willing to try.

Taking A Good Photograph

First, you need to get a good photograph of the person's face. It can't be any photo though. You need it to be a high contrast photo with the person's face illuminated from the side. The smaller and brighter the light source, the better. A decent flashlight will do. Or, a desk lamp. 

You want a picture that shows the subject's facial contours through a pattern of light and shadow on their face.


So, you need to position the light mostly to one side of the person's face but slightly in front like the diagram above. Also, turn off all other light sources in the room and turn off your camera's flash feature. Finally, don't position the camera too close to the subject's face. Its fine if the camera is 5-10 feet away. But, because you are taking a picture with very low light, you may need to be sure to hold the camera very steady for several seconds to allow it to focus and take the long exposure necessary to capture the picture.

Try several different positions of the light and have the subject make various faces (scary ones or pleasant ones). If you position the light above or below, you will get dramatically different facial contours from the different patterns of light and shadow. 

Sydney lives a few states away. And, her mother didn't have a very decent light source. It was a small LED toy with a light with a blueish hue. But, she took several pictures and sent them to me. Here are some examples.


Honestly, these pictures are pretty bad and I was still able to use them to get a good result. But, I had to spend about an hour in Adobe Photoshop playing with various images and with various image enhancements to finally get a decent image. I finally decided to work with the image on the left.

Processing the Image in Photoshop

Ultimately, you will need to produce a black and white (one bit) image; also known as a threshold image. That is, an image that is composed of either large pure white (no gray) or pure black (no gray) regions. Here is an the final result I produced from the image on the left, above.


I have Adobe Photoshop. But, many other image tools would probably work. Here is what I had to do to enhance the image in produce the one above.
  • Change the image from RGB color to Gray Scale image
  • Adjust brightness and contrast of image so the lighter regions are above 50% grayscale and the darker regions are below
  • Photoshop has a real convenient image adjustment tool called the Exposure tool. It has 3 sliders that allow you to easily vary the controls and immediately see the effects on the image. So, you can quickly find settings that result in a suitable image.

Printing the Image

You will note that the image above is mostly black with some light regions. Printing such an image is going to use a lot of ink. So, reverse it. Photoshop has a function to do that to. It changes black to white and white to black.

Selecting a Pumpkin

You want a pumpkin that is taller than it is wide, like most faces; about the same size as an standard sheet of paper. Honestly, a bigger pumpkin is even better because you can enlarge the printed image a bit giving you more room to cut the smaller details of the image.


Transferring the Pattern to the Pumpkin

Ok, so how do you transfer the printed pattern to the pumpkin? Well, first you need to carve out the insides of the pumpkin


Then, decide which side of the pumpkin you plan to cut with the pattern. Turn the pumpkin on its side, clean and dry the surface. Then tape the pattern to the pumpkin with several pieces of tape on each side to hold it well. 


Once you begin the process of transferring the pattern, you don't want it to move until you are done. So, make sure it is securely taped to the pumpkin. As a precaution, use a marker to draw a couple of small hash marks across the edge of the paper and onto the pumpkin on both sides. That way, if the pattern comes loose, you can reposition it by matching the hash marks.

To transfer the pattern, you trace along the boundaries of the dark regions, pushing a pencil tip or pin through the paper so that it makes a tiny hole in the pumpkin surface. In the picture below, I am using a transfer tool that came with the set of carving tools I used.


Below is a close up of the eyebrow region I started with. By the way, I cheated a bit with the eyebrow when making the image pattern. I am cutting it here so that light will shine through. But, in the original picture, Sydney's eyebrow isn't bright or in bright light. But, I needed an additional facial feature to help frame the whole image and so I manually touched it up in Photoshop.


Although I started with the carving kit transfer tool, I found the poker tip to be a little too fat and less accurate in tracing around the boundaries of smaller detail regions. You can see that in the close up of the eyebrow above. So, I switched to a simple push pin.

As you complete each region, you might want to cross it out with a marking pen so you know you've done it. That's especially true if you use a push pin because you can't see the holes easily. Once you have finished tracing all the regions, remove the pattern sheet.

In the photos below, on the left you can easily see the holes created with the carving kit transfer tool. The holes made with the push pin are a little harder to see. Next, take a maker pen and connect the dots. Trace the hole patterns with the pen to help make the pattern more visible. I used a red pen (image on right).


Ok, you've transferred the pattern. But, before you begin cutting it, you have some more carving to do on the inside of the pumpkin just behind the pattern. On that side, it helps if you continue carving out the inside of the pumpkin to narrow its thickness a bit. A pumpkin can easily have a 1 inch thick skin or more. Try carving out the inside of the pumpkin on the pattern side down to around half an inch. This just makes it easier to carve the pattern.

Carving the Pattern

First, you need some good tools. A typical kitchen knife won't do especially for the fine detail (small holes or small variations in the pattern's boundaries). There are plenty of carving kits available in stores around Halloween. Here are some of the tools that came in the kit I bought.


They are basically like tiny saw blades. I used the longer tool to cut the top of the pumpkin out. But, for the pattern, I used the smaller blade with the black and orange handle.

Its best to cut the smaller regions first and leave the bigger regions for last. So, I started on the eye, parts of the nose and teeth first. The smaller regions require finer cutting. Trying to do them when you've already cut out large neighboring regions is more difficult and more prone to accidentally tearing the pumpkin surface.

Finally, when cutting out the larger regions, its best not to try to cut them out in a single cut. Do them piece by piece by cutting the difficult parts of the pattern first and then just cut arbitrary paths through where the hole will be to create smaller pieces you remove. For example, in the picture below, you can cut across the dotted lines to help remove the hole in pieces.


Also, as you cut these larger regions, its helpful to stabilize the back of the surface with your other hand by reaching inside through the top. Just take care not to cut yourself.

Once you've finished carving all the holes, there is still some finishing work to do. The holes on the inside of the pumpkin are invariably no where near as well defined as they are on the outside. There is debris still clinging to the inside and walls of the hole are probably not parallel. These problems are worse for really thick walled pumpkins. The effect is that less light will come through these holes when you illuminate it.

So, the last step is to take some time cleaning up the holes by removing debris from the inside and squaring up the hole walls often by cutting some of the pumpkin wall inside the whole and behind the surface away.

When you're done, you have something that looks like this.


That really doesn't look too great does it. Don't be discouraged. Things look very different once its illuminated…


That's a photo of the actual pumpkin illuminated with a 1000 lumen flashlight from above. . .


Advanced Carving

What would be really great is to automate the whole process of getting a picture, processing it and then carving it onto a pumpkin. I think we'd need some simple, scriptable image processing software and a computer controlled laser cutter. You could probably turn out a pumpkin every few minutes and start a small business for the Halloween holiday selling "your face on a pumpkin" carvings. Maybe a possible retirement project...

Anyways, Happy Halloween
to my grand-niece Sydney and her mother Latisha.