Sunday, December 14, 2014

Cool-proofing your shoes

Where I live in Davis, California, the biggest problem during the winter riding season isn't so much snow or rain. For a long time, I just had a terrible problem keeping my feet warm. And, that was in spite of the fact that I'd wear two layers of shoe covers along with thicker socks.

What I discovered last year is that a lot of cold air comes in from vents and holes on the underside of my shoes.


In the above picture, I have a different style cleat and it shows all the holes under the shoe including 3 extra holes I drilled to move my Look cleat back half an inch. You can also see the shoe vents. There are two slits just in front of the cleat attachment area and another two just behind. These vents are great on hot summer days. But, during winter months in Davis, they just let too much cool air in.

I suppose you could just caulk the vents and holes shut for the winter and then remove the caulking with a small screwdriver in the spring. I haven't tried that but I am sure it would work ok. On the other hand, caulking doesn't provide much in the way of insulation and its a bit of a mess to remove.

What I do is cut up one or two of my wife's makeup sponges, like the ones pictured here,


and then stuff the pieces into the various holes. Of course, my wife prefers that I take one of her used sponges instead of wasting a perfectly clean one ;)

Now, the sponges won't stay in place without some help. So, after I seal up all the holes, I apply some shipping tape over them.


In the picture above (also showing my Look cleats -- which appear to be in need of replacement soon), you can barely make out the seams of the shipping tape covering the forward vents.

If you make sure the underside of your shoe is clean before you apply the tape, it will adhere to the shoe fine. Unless you wind up routinely getting it soaking wet, it should stay there for the whole winter season. Then, you don't have a mess of caulking to remove come springtime.

On cooler weather rides, my feet stay a lot warmer now. But, I sometimes still have to wear two layers of shoe covers.

I would have titled this post "Winterizing your cycling shoes" but lets be honest…Davis winters aren't anything like what our two-wheeled comrades in Minnesota or North Dakota have to deal with. For real winter cycling tips, I'm sure the folks in that part of the country have a lot of great ideas.


Tuesday, December 9, 2014

What's a dual flush toilet got to do with cycling?

This is supposed to be a blog about cycling. So, what's a post about dual flush toilets doing here? And, what is a dual flush toilet anyways?

Well, what I have to briefly mention here is so ingenious and so relevant to all drought conscious Californians, not only the cycling kind, I just had to write a short post about it.

So, in spite of the fact that it may well be the lamest segue possible. . .

Whats the first thing you do after getting home from a ride? I hit the bathroom.  On the topic of bathrooms, are you familiar with about the simplest, most cost effective, reliable and easy to install dual flush retrofit kit in the world?

What's a dual flush toilet?

A dual flush toilet offers two flush levels; one for #1's (liquid waste) and one for #2's (solid waste) (as an aside, I've always been partial to the 2/3 numbering system where two rhymes with poo and three rhymes with pee). A toilet can use substantially less water for a flush needed only for liquid waste, like maybe less than half as much! Furthermore, since we tend to go #1's more frequently than #2's, the potential water savings is magnified.

Dual flush toilets have been in use in Europe for many years but they haven't caught on much in the United States. However, with droughts impacting the mid-west in recent years and California this year, dual flush toilets are becoming more common.

But, you don't need to replace an entire toilet to get a dual flush toilet. You can convert an existing single flush toilet to dual flush. There are many retrofit kits available. I've tried a few like the Fluidmaster Duoflush and the Tap-n-Flush.

The Fluidmaster Duoflush costs $20-$30. It requires you to disassemble your tank and replace its guts. If you don't have experience with this, it can take upwards of an hour and you might not get everything sealed back up tight the first time. Worse, mine failed after about a year of use. The mechanism involves several moving pieces that slide past one another. The build up of hard water deposits on the mechanism's surfaces eventually ruined proper function. Even worse, the failure mode was to wind up leaving the (effective) flapper valve open so water would just run and run. Just a few days of that can undo all the whole year's worth of water savings!

The Tap-n-Flush is a novel idea and is certainly much easier to install than anything else I've seen. I was able to install it in about 10 minutes. It cost $18 on Amazon and the inventor of the Tap-n-Flush really provides excellent customer support! But, after having some challenges with it and after reading an ingenious comment on Amazon, I decided to return the Tap-n-Flush and go with a much simpler approach; a weighted flapper.

A weighted flapper

The way a toilet normally works is that depressing the flush lever pulls the flapper valve at the base of the tank open. The flapper is buoyed and remains open as water drains from the tank. When the water level falls low enough, the flapper looses its buoyancy and falls shut.

To create dual flush behavior, the flapper must be able to fall closed before water level in the tank drops low enough for it to loose buoyancy. The solution is to weight the flapper by adding, for example, a few washers to the flapper chain.

Purchase several (say 6-10) large, stainless steel fender washers at your local hardware store, similar this one. Disconnect the flapper chain from the flush lever arm and slide some washers onto the chain and down so that they rest on top of the flapper valve where the chain connects to it. You want to use stainless steel washers so they won't corrode or rust. You want to use enough washers such that the weight of the washers will prevent the flapper from doing its thing of just staying open on its own. Make sure you re-attach the chain to the lever arm such that it has the minimum slack.

Once you add enough washers, the flapper stays open only while the flush lever is depressed. The moment you release the flush lever, the flapper valve will close regardless of the water level in the tank. For a short flush (for liquid waste), you hold the lever down 2-3 seconds. For a normal flush (for solid waste), you hold the lever down for 5-7 seconds (or more). It works perfectly!

Instructions for use on top of tank

I can't take credit for any of this. I simply read the ingenious, one-line description of another Amazon user whose name I can't recall now or I would definitely have included it here.

The Tap-n-Flush is basically this same idea only on steroids. It adds a weight to the flapper but relies upon an electrical timing mechanism instead of your hand to hold the weight up. You adjust the amount of time the Tap-n-Flush holds the weight up for both short and normal flushes. But, just adding weight to the flapper is the real key to controlling water consumption.

A simple weighted flapper is the KISS (keep it simple stupid) solution. That's it. All it takes is to add several washers to the flapper valve chain. Its the simplest, most reliable, cost effective and easy to install dual flush retrofit kit in the world.

The video below demonstrates it in action.


Friday, December 5, 2014

Target Fixation: Seeing the Whole Picture

The argument goes something like this…

A motorist could possibly become fixated on a cyclist's rear (or front) flasher. Instead of helping a motorist see and avoid you, it can wind up drawing one, especially an impaired one, right to you. Its called target fixation (or the moth effect as in "…like a moth to a flame...") and its an argument used to suggest among other things that its safer to ride with steady lights instead of flashers, dimmer lights instead of brighter and even without lights instead of with. In a nutshell, this provocative argument runs entirely contrary to the conventional cycling wisdom that with greater visibility comes greater safety.

The web is rife with examples of hard-to-explain accidents, frequently involving some kind of vehicle steered by a human with a combination of hands and/or shifting body weight, where the cause is attributed to target fixation; flying, surfing, paragliding, motorcycling, skateboarding, biking, and driving to name a few. Such accidents often appear totally bizarre and surprising to observers. Observers explain that they thought both the hazard and the way around it were plainly obvious, that the driver (or flyer or surfer or whatever) had ample time to both see and react to avoid the hazard and instead, for some inexplicable reason, wound up driving (or flying or surfing or whatever) directly into it, almost appearing as though they had no choice in the matter. Such is the peculiarity of target fixation phenomena. The video below is a good example.


You can see the motorcycle driver, about half way through his turn, get out of his lean too look forward at something that grabs his attention. When he gets out of his lean, the motorcycle drifts to the far right hand side of the road and he appears to just drive directly into two cyclists.

The phrase "target fixation" was originally coined in the 1940's by U.S. military flight instructors to explain repeated incidents where pilots on strafing and bombing runs would sometimes wind up flying their planes right into the targets they were focused on destroying. Over time, the concept has gained broader appeal in explaining a wide range of accidents with similar attributes...
  • A machine, steered with the hands and/or shifting body weight.
  • An operator gazes and focuses attention on something, often a hazard, in their field of view.
  • The operator's hands/body tend to lean, twist, shift weight, in the direction of gaze.
  • The machine, even if subtly, winds up moving in the direction of gaze.
  • Before the operator is concsiously aware, s/he is heading directly at the hazard.
  • The operator is often taken totally by surprise by the realization that s/he is now headed right at the hazard and then locks up, unable to react to safely avoid it.
The solution? Look in the direction you want to go. The body will follow the look. The machine will follow the body.

I have experienced this myself while cycling. I see a hazard on the road ahead like a pothole, a branch or some flat hazard. If I stare at it, I can wind up running right over it. I've also experience something like it will driving too. I have seen some very odd vehicle configuration ahead of me on the road. It is something I have never seen before. It looks strange, odd, interesting. I wind up staring at it trying to figure what the heck I am looking at. While all my attention is focused on that, although my vehicle is still well within my lane, I am not paying attention to traffic stopping in front of me.

Consider both sides of the argument

So I do not dispute that the phenomena of target fixation is real. However, I get concerned when anyone makes an attempt to use target fixation as an argument to justify suggesting cyclists would be safer not using taillights, either bright or flashing ones, during night riding. You have to consider the whole picture here.

Certainly, the phenomena of target fixation is a potential risk. My understanding from materials I have read is that it is a more likely to occur in an impaired driver. That is, a driver that might be under the influence. However, what is the greater risk? Riding with bright and/or flashing taillights and encountering an impaired driver that might get fixated and then hit you or riding with no taillights whatsoever and getting hit because a driver doesn't see you or, perhaps almost as bad, causing that driver to have an accident because they are caught by surprise encountering you in the dark, overreact to avoid you at the last moment and wind up injuring themselves?

Lets walk through that again. For target fixation to be the cause of your injury, several things have to happen. You have to encounter an impaired driver. That driver has to become fixated on your taillight. The fixation has to be such that they do indeed wind up hitting you as opposed to a near miss because they react soon enough to avoid an accident. Note that the odds of encountering an impaired driver remain the same regardless of whether you are using a taillight.

On the other hand, consider what has to happen to be injured riding without any taillight. You have to encounter a driver (any driver impaired or not). That's it. That's all that has to happen! On roads without any shoulder, there is typically not enough space for a car and a bike to safely pass each other, especially if the bike's line of track is a typical 1-2 feet inwards from the roadside. The driver must take evasive action just to avoid hitting a bike. If they can't see you, or can't see you soon enough in advance, that won't happen and you'll be hit.

So, while there may be a statistically measurable increase in the likelihood that a cyclist could become the victim of a target fixation accident as a result of using such lights, there is absolutely no doubt whatsoever that there would be a substantially higher likelihood of being the victim of an accident simply because a driver is unable to see them in the dark.

Other issues with bike taillights

Now, there are some other issues with respect to cycling taillights that are probably worth more to worry about than target fixation. As you might reasonably conclude, observers have more difficulty judging distance and speed to a target that is intermittently visible (e.g. a rear flasher on a dark night) than one that is always visible (e.g. a taillight that is constant on). On the other hand, a flashing light tends to draw attention to itself more easily than a constant light. For this reason, I've heard many cyclists suggest riding with two lights; one flasher and one constant. Seems like a good idea.

Next, there is the question of motorist's visual familiarity and practice of observing and identifying nighttime traffic hazards. The fact is, we all have practice identifying taillights of vehicles ahead of us on the road. Those lights are large, at least the size of our hands or bigger, constant on, come in pairs (a left and a right taillight). Taillights used in cycling are smaller, about the size of our thumb, are often flashing, sometimes in very bizarre patterns that are strange to unfamiliar observers, and of course do not come in pairs. This suggests using unusual or bizarre flashing patterns for rear taillights may not be the best thing for night riding.

For these reasons, it is reasonable to consider whether many motorists might be unfamiliar with this kind of flasher and upon seeing one for the first time, or at rare times, may wind up spending more attention (e.g. fixating) than one might think trying to figure out what they are seeing. That certainly reads suspiciously a target fixation scenario.

Lastly, if a motorist happened to confuse a dim constant on cycling taillight with a car taillight, the fact that its a smaller light might actually cause a serious misjudgement of distance; the motorist might think the vehicle is much further way than it actually is based on size. This is a good reason not to let your cycling taillight run low on battery power. A healthy battery in a cycling rear flasher often generates enough light to counteract any natural attempts to judge its true size.

In fact, I have experience with a driving problem similar to this with the headlight separation on Saturn sedans. Saturn manufactured its sedans with unusually closely separated headlights. When passing slower traffic on two-lane roads, the headlights from oncoming vehicles are a visual cue for estimating distance. Headlight separation is part of this. When observing an oncoming vehicle in the opposing lane, the closer together the headlights are, the further away the vehicle is. But, because Saturn's sedans have unusually close headlight separation, they can falsely appear further away than they really are causing a harmful misjudgement of distance. If their headlights were more separated than unusual, they would appear closer than they actual are and that would be harmless.

Sunday, November 30, 2014

Non Cycling Market Head Lights

The price of good lights for bikes that you would find at any bike shop are amazing to me. The low end for a decent, say 250 lumen light, is easily more than $100. And, they just go up from there.

What I've wanted for a bike light for a long time is a 500+ lumen light that I can use for several hours of night riding (actually as many hours as I am willing to carry extra batteries for) with field replaceable, rechargable batteries that is under $100.00.

Meet MonsterFlashlight. They offer a wide range of ultra-bright, portable flashlights. Some of their products are very suitable for cycling. I have been using their Tactical Pro T6-1000-4 for night riding for several years now. It has several modes including 3 different power levels; 1000 lumen (2 hours), 500 lumen (4 hours) and 150 lumens (6+ hours) as well as a flashing mode (10+ hours). It uses a single 18650, Li-Ion replaceable, rechargable battery. I use the extended life batteries, which MonsterFlashlight also manufactures and sells. I usually carry 2-3 extra batteries when I know I will be doing a lot of night riding.

The 1000 Lumens of this flashlight is plenty bright enough for any night riding I have done. I used it in the bowels of the Death Valley Fall double, decending from Hells Gate at 40+ mph at night and was very confident with how far down the road this light allowed me to see. Most lights designed specifcally for the cycling market are 500 Lumens and below and cost upwards of $200. The MonsterFlashlight Tactical Pro T6-1000-4, is only $65.00 for the flashlight. If you also by a charger and two extra, extended life batteries, the total price is still under $100.00.

When I originally started using this flashlight for my bike, MonsterFlashlight wasn't offering a handlebar mount. I purchased several different mounts on Amazon, each mount costing less than $5.00, to decide which is best. I have been happy with this one, which is less than $2.00. Also, originally, I had some problems with the flashlight not handling vibrations from my bike very well. The tail switch on the light would start to get finicky and the light would randomly go off and on as I went over bumps in the road. But, I talked with MonsterFlashlight and then suggested some servicing of the tail cap (which I did) and also sent me a replacement tail cap which has worked fine.

In addition, now apparently MonsterFlashlight is also selling a handlebar mount. But, at $19.00 its abit pricey. And, from the picture, it appears to be a mount already available through Amazon. So, I would just go to Amazon and search for "flashlight handlebar mount" and select from among the many options available there.

As an aside, Costco has been selling a 3-pack of Duracell LED flashlights that use AAA batteries for past several years. These started at 200 Lumens, then went to 250 and are now 300 Lumen lights. The pack of 3 costs only $20.00. They offer 2-3 different power levels including a flashing mode and are a terrific light for the price. Again, all you need is a decent handlebar mount for them.

For head mounted lights, I found this 300 Lumen, LED based headlight on Amazon for under $10.00 and have been very happy with it. It also uses a single 18650 Li-Ion battery (thats important so the two main lights I have use interchangeable batteries). And, the spot is focusable meaning you can have a wide beam or a narrow beam and easily adjust it while you ride. This light not only allows me to see forward and around turns but I use it also to read a route sheet or my Garmin computer while riding at night.

For rear flashers, I would recomend the Cygolight HotShot. At 2 watts, this light is awesomely bright! It is very visible from more than a mile in broad daylight. On flash, it has a 36+ hour runtime. It uses a built-in (which I don't like so much because I would like the option of replacing the battery if I have the misfortune of running out of power in the middle of a ride), rechargable Li-Ion battery.

Saturday, November 22, 2014

Ten Things I Hate About Sharing The Road

I am a cyclist and a motorist. So, I where two caps.

I have been riding bikes on bike paths and roads in an around Davis for more than 30 years. I have also ridden many of the interesting rides throughout Northern California. And, I have ridden cross country.

As a motorist, I have been commuting between Davis and Livermore for about the same number of years on both freeways and backroads; 80E-5S-205W, or 80W-680S-580E or 113S-12E-160W-4E-Vasco S.

As cyclists, we tend to have to share everything. We share roads with motorists and bike paths with pedestrians, pets and small children as well as other cyclists. To paraphrase Grant Peterson, we're both prey and predator. On roads, we're prey and on bike paths we're predators.

To be sure, with my cycling cap on, I have had a few very negative interactions with motorists. On more than one occasion a driver of a big diesel pickup has slowed down and pulled up aside of me and then intentionally gunned his engine to belch black smoke at me. Occasionally, motorists turn too close in front of me.

But, by far my biggest complaint about motorists has to do with passing; when, where and how fast. All too often motorists choose to pass when there is no clear view around an approaching turn or over the top of a hill. Sometimes, to prevent a motorist from attempting a pass to close to a blind turn, I move my line of track out towards the center of the lane. This is to discourage them from trying to pass when they don't have room and then passing me to close. Alternatively, when I am on flat straight roads with visibility for miles, motorists sometimes fail to move over far enough when they have plenty of room and then pass at high speed.

But, to be honest, at least around our little towns of Davis, or Winters or Vacaville, motorists are pretty used to sharing roads with cyclists and do a decent job. When it comes to the ongoing tension between motorists and cyclists sharing the same roadways, at least around Davis anyways (an unquestionably cycling-friendly town), there are more things I hate about cyclists behavior than motorists. Here are my top ten lists...

. . . About Cyclists

  1. Flying by pedestrians on a bike path too fast and/or passing too close.
  2. Riding 2 or more abreast along public roads when cars or other cyclists are approaching from behind and failing to re-arrange in single file.
  3. Not stopping at intersections with stop signs even when cars are present.
  4. Passing cars on the right that are stopped at an intersection when there is no shoulder or bike lane.
  5. Failing to check in with a cyclist stopped at the side of the road to make sure they are ok.
  6. Passing other cyclists too closely.
  7. Wheelsuckers that aren't willing to share the work.
  8. Not yielding/slowing to let a cyclist overtaking them from behind pass quickly on a road with no shoulder and a lot of car traffic.
  9. Riding at night without lights.
  10. Riding while using a cell phone.
  11. Endless diatribes about shaving 100 grams here and there at a cost of perhaps several thousand dollars when a slight change in nutrition would shave over a kilogram from their bodies. (I just had to include this one)

. . . About Motorists

  1. Driving impaired.
  2. Dividing attention between driving and anything else.
  3. Passing too close.
  4. Passing too fast.
  5. Passing when view of oncoming traffic ahead is obscured.
  6. Opening car doors without checking for cycling traffic approaching from behind.
  7. Passing cyclists and then immediately turning right in front of them and cutting them off.
  8. Not dimming high beams for cyclists at night.
  9. Rolling through or completely failing to stop at stop signs where cyclists are crossing.
  10. Motor vehicles (a bike is a way better way to travel ;).

Sunday, November 16, 2014

Using the Garmin 405 for Cycling

I guess I am a bit of a penny pincher but I just haven't been able to get myself to foot the several hundred dollars to buy a high end Garmin cycle computer like the Edge 500/510 or 800/810. I just cannot justify the cost. Also, I don't train with power either. I train with heart rate only. I like to know the stress I am putting on my body, regardless of the amount of power I am putting into the rear wheel.

I bought the Garmin 405 when it was sold at Costco for $140 back in 2011. Its a wrist-watch kind of device pictured below.

One nice advantage with the wrist-watch design is that I can conveniently use the same device for running too. Even though its nice and small, it does include GPS.

The 405 supports several accessories including the Garmin footpod, the Garmin ANT+ Heart Rate Strap and the Garmin speed/cadence sensor. There is also a nice handlebar mount for it but I don't use that because my bar top real estate is all taken up by some aero bars such as in the picture below.


I have been using the 405 every year putting in between 4,000 and 8,000 miles per year. I have never used advance features such as the virtual training partner or downloading a route to it to help guide me on an unfamiliar route.

LCD Display

The display supports 3 data fields simultaneously; one in really large font and two others in much smaller font. You can set the 405 to continuously page through 3 different pages of data for a total of 9 different fields. You can set the amount of time between page switches. The display is easy to read in bright daylight.

In night riding, there is an LCD backlight. You just have to tap the bezel/edge with two fingers to activate it. You can set the amount of time the backlight stays illuminated after activating it. But, having it on continuously will run the battery down too quickly. Since I ride with a helmet light, just looking down at the 405 provides enough light to read it during night riding.

GPS and Battery Duration

With the GPS on, the 405 lasts for about 7.5 hours. That's fine for most of my training rides. But, its not good enough for a double century; the kind of ride I like to do.

If you have a cadence/speed sensor, however, you can turn the GPS off and the battery will last for more than 24 hours. The 405 will compute speed and distance traveled by counting wheel revolutions. It just won't track where you went on a map.

Assuming you are not attempting to use the 405 to give you turn by turn navigation, the only thing you'll really loose is that when you go to upload your data to Garmin Connect, it won't include your route map. But, if you've correctly calibrated your wheel size, all your other data will be good. For example, see my data from the 2014 Eastern Sierra Double

This is the mode I used the 405 in when I did my cross-country tour and whenever I do long training rides and double centuries.

Navigation with a Route/Cue Sheet and GPS off

I have followed many a rider with better cycle computers, like 510 or 810, only to wind up off course or worst lost and having to back track. The lesson? You still need to pay attention to your route sheet even with high end devices.

This might be obvious to most readers but I will include a short description of navigating with the 405 here for novices. With the GPS off to save battery power, the way you navigate with the 405 involves a little more interaction with you, the rider. With the speed/cadence sensor, the 405 computes speed and distance by counting wheel revolutions.

First, be sure your route sheet includes distance deltas (the distance between) for each navigation point. If it includes only cumulative distance traveled, you can always compute the deltas and write them onto the sheet. Next, select one of the data fields you display as Lap Distance (and be sure Auto-Lap is off). With lap distance on the display, the 405 will display the distance you have traveled since last pressing the lap button.

If you have your wheel size properly calibrated, it shouldn't be in error by more than 1-2%. On short segments, say less than 10 miles a 1-2% error will be no more than 0.1 to 0.2 miles plus or minus. On a very long segment, say 100 miles (e.g. 100 miles to the next navigation point on your route), a 1-2% error in wheel size calibration will translate 1 to 2 miles in error plus or minus on your route. However, routes with segments longer than 10 miles are rare.

For most situations, as a good rule of thumb, if you start looking for your navigation point 1/2 mile before your 405 says you will reach it, and continue looking until you are up to 1/2 mile beyond where your 405 says it should be, you should find it. Accommodating for 1-2% error on a very long segment you might have to extend these distances plus or minus up to a mile or two.

Upon reaching your navigation point, be sure to press the lap button again to begin measuring the distance along the next leg of the route.

As you proceed along your route, you will soon find that your 405 is either always overshooting or always undershooting your next navigation point. And, you can use that knowledge to adjust what to expect as you reach the remaining navigation points on your route. 

Running on a Treadmill with the 405

Just as with cycling, you can use the GPS feature of the 405 for running too. Since I run for short periods of time, the battery life with GPS enabled is not an issue for me when running.

However, I have still found it useful to disable the GPS on the 405 when doing treadmill running and just rely upon the foot pod accessory. With my stride properly calibrated, the 405 computes my speed and distance traveled based on counting steps. Since on a treadmill I am basically staying in one place, the GPS is pretty much useless anyways. And, with my stride properly calibrated, I have found that the 405's estimates of my speed and distance are spot on what the treadmill computer displays.

I suppose the same rules would apply for using a bike stand trainer. That is, disable the GPS and make sure your wheel size is properly calibrated. Then, estimates of speed and distance traveled while pedaling on the trainer should be close to the real world not including drag due to wind of course ;)

Heart Rate Monitor

The HR strap for the 405 is an ANT+ based device. It is not bluetooth or wifi based. Higher end devices support bluetooth HRMs. I've had minor issues with the 405's the heart rate strap sometimes giving wonky readings. For example, look at this ride data. At 57 minutes into my ride notice that my speed and cadence are steady but all of the sudden my HR plummets from around 160 to below 100 and then stays there for more than 5 minutes. In fact all the readings from the last 10-15 minutes of my ride are bad. That can be a real pain in the neck if you are using the HR reading for training.

Sometimes bad HR readings are due to a weak battery. I have read that sometimes being near transmission lines can cause this behavior too. Other causes can be a lot of static electricity in your garments or body, poor contact with your chest maybe if you have a lot of chest hair or if it gets really, really wet in a heavy rain. On the other hand, moisture on the skin is kinda important to maintain good electrical contact. So, if you are riding such that your chest area is dry and free from any moisture or if a good wind on a downhill drys out your chest area, the HRM may start to give less reliable readings. There is also a gel-like product you can by much like EKG gel to help improve electrical contact with the skin. I've never used it though and I have no idea how much more likely it is to overcome these issues.

My heart does have an odd beat, something called a Premature Ventricular Contraction (PVC). Its a benign condition. However, I wonder if sometimes causes the HRM to give wonky readings.

CR2032 Battery Life

The heart rate monitor, cadence/speed sensor and foot pod all use CR2032 batteries. I have found that these last me an entire year of riding before I have to replace them.


Friday, September 12, 2014

The Davis man who cycled up Haleakala once but down twice

We're in Maui celebrating our 25th wedding anniversary.


We're here to celebrate 25 years of marriage! Just about half our lives married and more than half together.

Sandy just celebrated her 51rst birthday. I will be celebrating mine in a few weeks. You could say we're "51-50" in love with each other. "51-50" is police code for a crazy person.

Among other things, throughout or marriage Sandy has supported and at times I'm sure she's felt like she's had to put up with all my cycling. Even while we are here to celebrate our 25th anniversary, we spent one whole day apart while I went off on yet another cycling adventure; to climb Haleakala. A recent article in Bicycling magazine says it's the longest paved road climb in the world. Some of the locals I met while doing it think that is worthy of a "51-50."

Here I am at the top. Big smile 'cause all the climbing is done. Do I look crazy?
The following day, I climbed Haleakala a second time…in a bus with Sandy and several other people to watch the sunrise.

On top of the (Maui) world with my best friend in the world, my wife!
Then, we all got on single speed cruisers and coasted down Haleakala together, a common tourist activity.

That's Sandy in the green jacket looking back at me
Climbing Haleakala was a challenge. Except for some problems with the rental bike, the climb and descent was both spectacular and uneventful. The second descent on coaster bikes with Sandy and a group of other riders, some of whom hadn't ridden a bike in 20 years, was much scarier!

Haleakala Facts

"Haleakala" means "house of the sun." It is a dormant volcano on the island of Maui, Hawaii. It last erupted sometime in the middle of the last millenium. Weather at the summit can be highly variable. It's not unheard of to start in 90+ degree temps at the base and summit at near freezing temps with wind and rain. Typically, for every 1,000 feet in elevation gain, the temperature drops 3-5 degrees. Maui Cycling hosts a race up Haleakala called the "Cycle to the Sun." Ryder Hesjedal holds the record at around 2.5 hours.


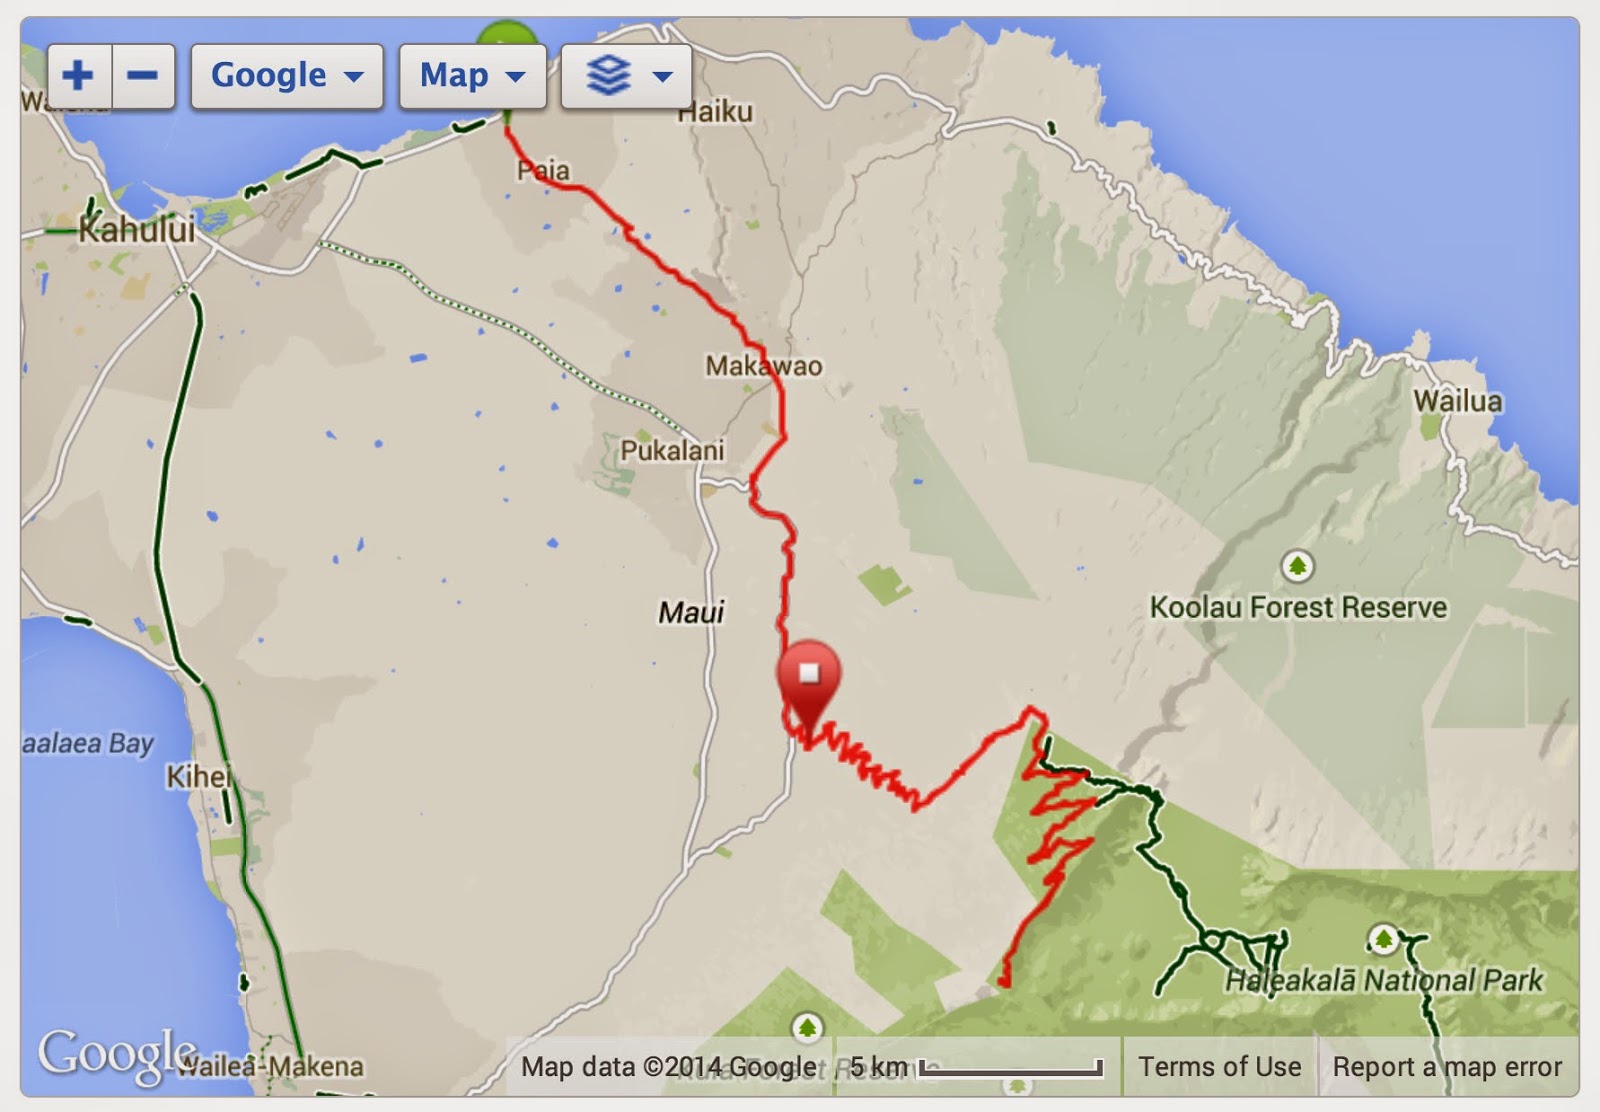
The route starts at Paia Bay on Baldwin road. After going 6 miles up Baldwin-Olivia Rd. you make a right on Hanamu Rd. until it intersects with a left turn onto 377. A few miles later, a left turn onto 378 takes you all the way to the summit. Once you turn onto 378, there isn't much in the way of civilization except for two Haleakala Park visitor centers. No water stops. No food. No shelter.

It is 36 miles from the base, at sea level, to the summit at 10,000 feet. There are only a few short sections of negative gradient  during the whole climb. Below 7,000 feet, the gradient is a pretty constant 5-6%. There is about a 200 meter section on Baldwin road just after crossing over 366 in Makawao that's around 8-9%. Once you pass into the park entrance, the gradient lessens a bit to 4-5%. The last quarter mile has a couple of sections less than 100 meters of 8-9%. The main challenge of the climb is that it simply never, never, never stops rising ahead of you.

Haleakala elevation profile from my Garmin 405. It ran out of batteries half-way down.
The climb is nicely divided into three pieces by two decent places to stop and rest. One is the Kula Market place at about 12 miles and 3,500 feet. There are public restrooms. There is a great selection of food and fluids. The other stop is the lower visitor's center just after entering Haleakala National Park at about 25 miles and 7,200 feet. There are public restrooms there as well and drinking fountains to refill bottles. If the center is open, you can purchase from a limited selection of small snacks. There is another visitor's center just below the summit with public restrooms. The park ranger told me the sink water there is potable.

Except for the first several miles on Bladwin road, the road surface is excellent. There is even a decent shoulder until you enter the park at 7,000 feet. On the route I took, there are four cattle guards. They are fine but something to remember when you are descending at 35+ mph.

Haleakala is a tourist attraction much as the rest of Maui. So, there are a lot of motorists with little to no experience sharing a narrow road with cyclists. But, I think that means motorists wind up being much safer than a typical northern California driver might be. I didn't have any issues with motorists and plenty of vehicles passed me. There are signs all along the route reminding motorists that bikes "share the road." I felt very safe on both the ascent and descent.

You should carry two water bottles, some food and extra layers to put on for the first several thousand feet of descent. A rain shell would be a good idea too. The day before I was there a couple of riders got hypothermia while descending and had to be bused back down.

The terrain varies dramatically all the way up. At the base, the land is rural agriculture with some light residential. It's hot and humid and not much in the way of shade trees. Winds are nonexistent or light. At about 2,500 feet, it's rain forest; lots of big trees with plenty of shade. Between 2,500 and 5,000 there can be clouds and fog. Even if its not raining, there is so much humidity water condenses out on the trees and drips almost as if it might as well be raining. There is a very abrupt change from rain forest to native grasses and no trees. Eventually, the grasses give way to red volcanic rock and small shrubs. Above about 9,000 feet, all you see is black volcanic rock likened to being on Mars.

Finally, there is a $5 fee at the park entrance, 24 miles and 7,000 feet into the ride. So, be sure to carry some cash or credit card.

Up Haleakala Once


My home town of Davis is flat in every direction for more than 25 miles. I haven't seen anything that looks remotely like a hill since completing the Eastern Sierra Double back in June. So, why attempt a climb like Haleakala? Mainly because I don't know if I will ever be back in Maui again and I didn't want to pass up the chance to ride it.

I drove to Paia arriving there a half-hour before the bike store opened. This was my view of Haleakala from the car at about 7am on the way from Lahaina to Paia. Look at how clear it is! It doesn't stay that way.

View of Halakala from the car on the drive over to the start.
For comparison to a local climb, here is a picture with Mt. Diablo inset in approximate relative scale.
Approximate relative scale to Mt. Diablo

First problem upon arriving in Paia: where to park? The main (and only) street in Paia has only two-hour parking. The bike rental store had no space to park either. I drove a few blocks up Baldwin road and found an empty gravel lot that was labeled for public parking.

I would have liked to get started pedaling by 6am. However, the store I rented from, Maui Cyclery, didn't open until 8AM. So, I decided to start the climb as soon as possible after the store opened and hopefully be back to return the bike by the time the store closed at 4pm. Apparently, many of their customers attempt that but don't actually make it.

It's not a very good sign when the rental shop doesn't even have printed route sheets and instead walks you through the route verbally while pointing to a tiny map pinned to the wall. "Oh, by the way, if you miss this turn, you ride 5 miles and climb 1,500 feet to a dead end." Or, when you return the bike and tell them you think the bottom-bracket is failing and they respond "I thought Joe had fixed that." I plan to do a follow-up blog about rental bikes. Needless to say, I had some technical difficulties with the bike! But, I did bring my own pedals, shoes and saddle.

I reserved a 59cm Lightspeed carbon frame with 105 components and a compact double with a 12-30 cassette. It's my first time riding a compact double and only my second time riding carbon. They put on my pedals and saddle. Because time was precious, I test road it only a minute or two and made some adjustments, mainly to seat height. They included a tool bag with tube, tire irons and CO2 cartridges. Because I rarely use CO2 and find it unreliable, I would have preferred a pump. I had to ask them to please include a multi-tool so I could make adjustments en-route if necessary. Good thing I did too. More on that later.

Two other riders came in just behind me for the same reason; to climb Haleakala. As they got fitted out, I gathered my gear, filled two bottles with water and started up. It is hot in Maui reaching temps of 90 degrees at sea level. But, its also very humid too, a bad mix. Worse, the sun is intense and I burn easily. So, I not only had on sunscreen, I also wore sun protective garments such as you see me wearing here.

These extra layers make me sweat even more. I was very concerned about proper hydration, electrolytes and cramping. I planned to take one electrolyte capsule every half hour. The sweat was dripping off me the first few thousand feet of climbing. Fortunately, as you climb, the temperatures drop to something more comfortable.

I was drinking constantly. But, I was a little concerned how easily my water bottles slid into the cages. The cages didn't really hold on to the bottles. The bottles just sort of rattled around inside the cages. That's fine for a 7 mph climb because your unlikely to hit a bump hard enough to bounce them out. But, not on a 35 mph descent. I had a bad feeling about those cages.

Not long after I started up, the bottom bracket on my rental bike started creaking. The cranks seemed to turn smoothly but with every turn there was a creaking sound. I figured if the bottom bracket failed entirely, I would just turn the bike around and coast back down to Paia. But, it was a thought that plagued me more as I got further into the climb. I would hate to do so much work and then have to abandon.

Next, about 9 miles into the climb, something happened to my seat mount. The saddle went from being perfectly secure to flopping up and down 20-30 degrees. At first, I thought something had broke. But, I didn't hear any metal parts fall to the ground. Nonetheless, I went looking down the road behind me for parts that may have come off. I didn't find any.

It was a two-bolt seat mount with bolts fore and aft that offer ultra-fine adjustment of seat angle. Ok, so now you see why I asked to have them include a multi-tool in the tool bag. I used the tool to tighten the aft bolt but it did little to tighten the seat. It was still flopping up and down. The front bolt needed tightening. However, the multi-tool they included in the tool bag (similar to the one pictured below)


couldn't reach the front bolt. I mean, if you succeeded in actually getting the hex key into the bolt, you could not turn the tool more then about 1/5th of a turn without it hitting the seat post and preventing further turning.

It was then that the two riders I met in the shop caught up to me. However, only one of the two had a tool bag and the shop didn't include any tools in it. The other rider without a tool bag would later turn around at mile 32, around 9000 feet, and ride back alone with no way even to repair a flat if he had one.

I tried to flag down one of the many vans supporting downhillers. These are novice riders who were bused to the top and then coast down on single speed cruisers; an adventure Sandy and I would do the following day. There were hundreds of these riders passing me on the downhill side. But, none of the vans supporting them would stop to render me any assistance. That was really frustrating! After about 20 minutes of 1/5th turns of the fore saddle bolt, I was able to get the saddle secure and continue riding.

I stopped at Kula Market Place about 12 miles and 3,500 feet into the ride to re-fill my bottles and eat some food. Some locals asked me how my ride was going. They thought I was headed down. When I told them I was on my way up, they got very wide eyed! "To the top?" they said, somewhat alarmed. "That's the plan. We'll see if my legs (and bike) can hold out." I said. They wished me well and reminded me to be careful on the road.

Before leaving Kula Market, I adjusted my seat height again. Because I am not familiar with carbon frames, I am unsure how far to tighten a seat post bolt. Too far can irreparably damage the seat post or seat tube. But, too loose and the seat won't maintain the desired height. For fear of breaking things, I think I was going too loose. So, the seat would slowly fall. I would wind up stopping several more times to adjust it again and again. Although I could have seen this as a major nuisance, it actually gave me a great excuse to stop and rest a bit too.

At the 4,000 foot sign.
The park entrance is at about 7,000 feet and 24 miles into the climb. One of the two riders, the one without any tool bag, was there resting. His riding buddy had continued on without him. So, now, he joined up with me. About a mile beyond the park entrance is the lower visitor's center where you can refill bottles and use the restrooms. If the visitor's center is open, you can also buy some small snacks too. I stopped there for about 10 minutes and gave Sandy a call to let her know how things were progressing. She was taking an all-day bus tour on the Hana Highway. I ate a Power bar and a Stinger wafer I was carrying. The other rider who briefly joined me decided to continue on instead of rest. But, not long after he left, he passed me going the other way, descending, deciding his legs had had enough for the day.

Once you pass into the park, the gradient reduces somewhat to something more like 3-5%. Well, that's true up to the last quarter mile. In the last quarter mile the gradient pitches up to 8-10% for a couple of 50-100 meter sections. That's brutal at that elevation with about 36 miles and 10,000 feet of climbing already in your legs.

Once you are in the park, there is really no shoulder at all and no guard rails. And, the drop off the side of the road is steep and jagged with volcanic rock.

And, at the 8,000 foot sign
By this point, my legs don't feel great. I mean, I feel fine but my legs are just sluggish. They are sore. I can still turn the cranks ok but its like I don't really want to anymore. I am frequently changing gears and standing to vary my cadence. My technique is off. My back is hunched and my breathing is not deep and relaxed. My heart rate is ok though; mid-150's. I stop several times to rest too and eat some more and adjust my seat height. Occasionally I wonder if I really have what it takes to get up this beast of a climb. I mentally start dividing the mileage and elevation remaining into manageable pieces. "At the park entrance, there are 12 miles and 3,000 feet left," I think. I divide that into two pieces. "6 miles and 1,500 feet to mile 30. I will rest there for a few minutes," I say to myself.

But, I wind up having to rest at mile 28 for a few minutes. I click back in and push past mile 30. I am staying in the lowest possible gear at this point. My cadence is decent, 60+, but I don't feel confident in my legs. I shift two gears to stand for a while. That feels better...for a while...until it doesn't anymore. I slump back down into the saddle. There are "mile markers" all along the road. Where I turned onto 378, a sign said "22 miles" to the summit. I just pass "MM18". That means 4 more miles to go. Not long after, some structures and the observatory come into view. I can see the summit now. The weather really couldn't be any nicer. Its full sun and the temperatures have to be in the mid-50's and the wind is light. The time is around 1:30PM. I stay in my lowest gear and just spin. I don't feel like I have much in the way of power but I also start to feel like I have enough to finish it.

I see the small shack at the very top and people walking around it. There are less than two miles and less than 1,000 feet to go. I reach the upper visitor's center at 9,700 feet. There is a big parking lot and I pull off to rest for the final push to the very top. My heart sinks a bit when I look at the road ahead. It's steeper than anything else I've seen up to now. I contemplate calling it "good enough" and turning around. After a few minutes rest though, I decide to push for the last quarter mile and few hundred feet.

As I hit the first of two 8-9%+ sections, my heart rate climbs, fast! I don't feel very good. I am wondering if I am pushing myself too hard at this elevation. This is the highest I have ever pedaled a bike. But, It's too steep to safely click out with cars coming up from behind and going down. I take a deep breath and try to relax and just keep the cranks turning. I make it over the first steep section and round a bend to see the upper parking lot. The end of the road is in sight! One more somewhat less steep section of maybe 100 meters lies ahead. I push over it more easily than the first. I pass the 10,000 foot sign and loop around the parking lot. I made it. I'm done. 6 hours! God that was long and hard!


Down Haleakala Once

I did not spend much time at the top. I took some pictures to prove I was there. Some motorists passed by and stopped either to congratulate me or inquire as to my sanity. Others just passed shaking their heads. One stopped and offered me a Coke. I took it. I wished it was cold though.


I put on some layers for the descent and started down. Now, you would think that with all the problems I had with the bike, I might have taken some extra time to inspect wheels and brakes before I started down. Nope. In retrospect, given my experiences the next day with our coaster descent group, failing to carefully inspect the bike myself before descending was just plain stupid! I was a little lucky I didn't have any major problems on the descent.

While descending I am reminded of another minor issue I had with my bike. I am accustomed to and prefer to ride with a rear view mirror so I can see traffic approaching me from behind without having to turn my head. That's especially important during the descent phase where speeds are higher and you really don't want to take your eyes off the road. However, my rental bike was not equipped with one. I supposed if I had thought to ask for one, they may have provided it. I don't know.

It was easy to keep up with car traffic on the way down. My descent speed was 25-35 mph almost the whole way down. It still took close the two hours to descend all the way back to Paia. The one problem I did have though was hitting cattle guards at 30+ mph with my loose water bottle cages. One of my brand new bottles popped out. Fortunately, I noticed it immediately and turned around and found it on the side of the road. When I got back down to about 2,000 feet elevation, I had to remove all the extra layers I had put on. It was just uncomfortably hot. In fact, I removed every layer except my jersey stuffing everything into the available pockets.

Another serious problem with the descent is that the views are just spectacular! They are a huge distraction and you can wind up wanting to take your eyes off the road for longer than you should at 35+ mph.


Otherwise, except for the cattle guards, the descent was uneventful. I arrived back down in the Paia parking lot where I had parked my car at 4:15PM. I called the bike shop from there to see if they were still there for me to return the bike. They were!

So, I threw the bike in the back of the car and drove to the shop to return it. I explained all the problems I had, including the creaking bottom bracket. "I thought Joe (or whoever) fixed that," they said. So, they rented me a bike they knew they were having problems with and didn't bother to mention to me to keep an eye out for it. They said they "felt bad" for all the troubles I had with the bike and there was talk of offering me a discount. Nope! They charged me full price. I didn't complain.

But, I just would not ever recommend using this bike shop to anyone else. I've heard good things about West Maui Cycling. Because we were staying on the west side of the island, that would have been a better choice anyways as I wouldn't have had to worry about getting the bike back the same day to avoid two trips to the shop. And, I would have had more time to test the bike out and adjust it before taking it on such a challenging ride.

Down Haleakala Twice

The next evening, Sandy and I got up at 1am to meet a 2am bus to take us to the top of Haleakala to watch the sunrise. This is a popular activity for tourists and locals alike. The cheesy touristy version includes a ride back down on a coaster cruiser bike. That's what I had planned for Sandy and me. We got to bed around 8PM that evening and so actually got about 5 hours sleep before waking up to meet the bus.

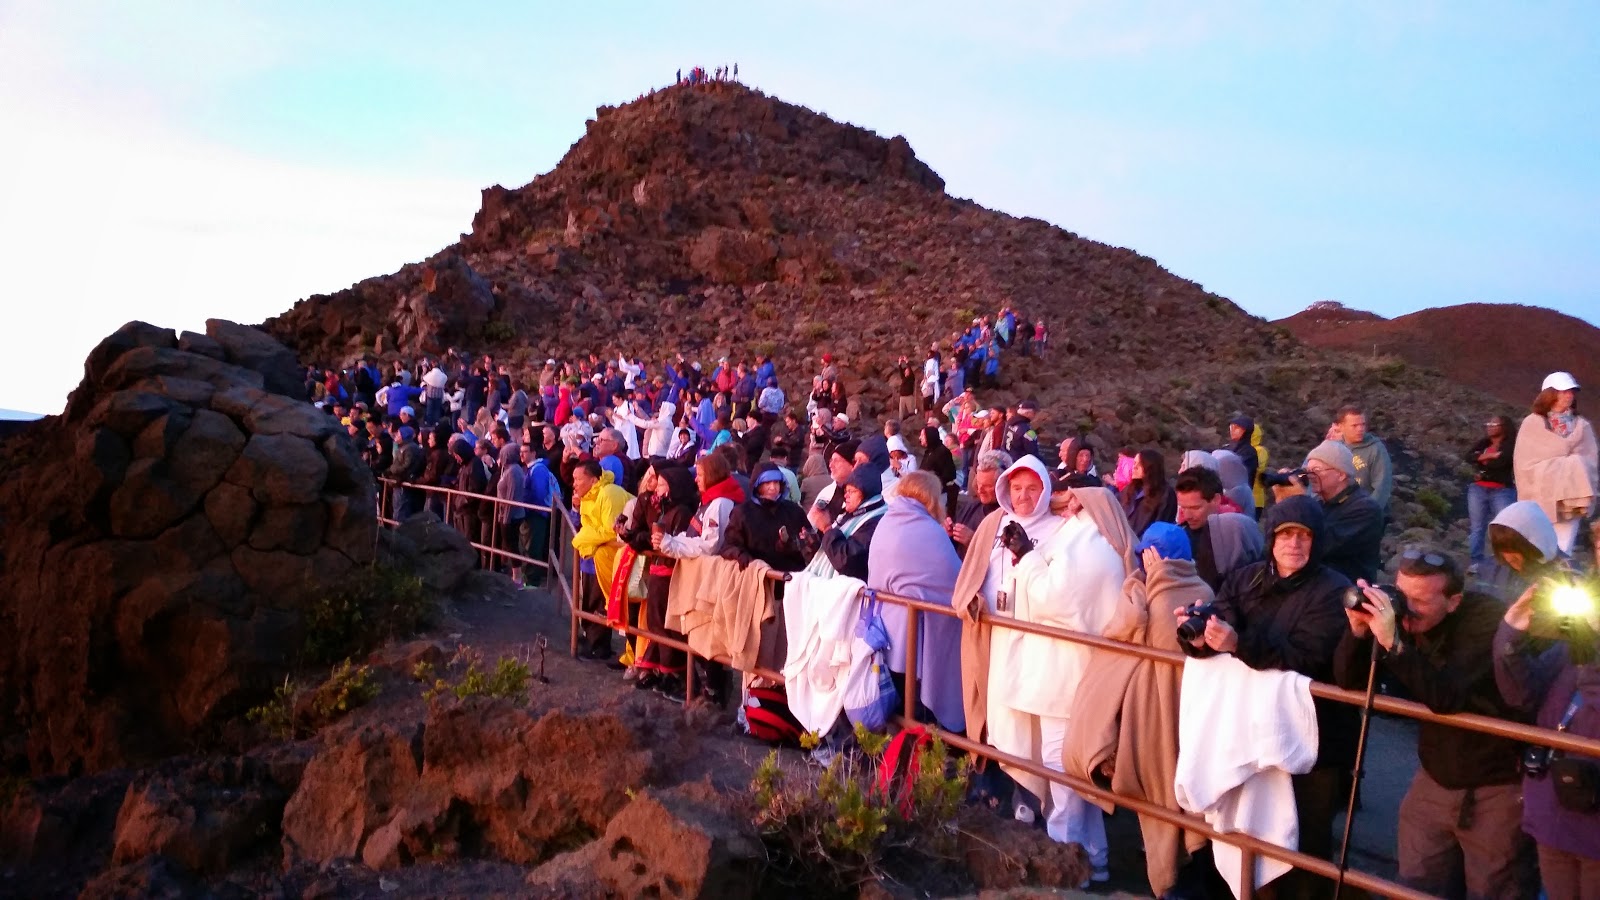
We watched the sunrise at the upper visitor's center. There were a lot of people there doing the same thing.


We were at 9,740 feet elevation. That is the highest elevation Sandy has walked around at. We did go over Tioga pass at 9,943 but we never got out of the car and walked around.

The sunrise was incredible. We even saw the tiny dot of light of the international space station pass overhead. But, it was a bit of a cloudy morning to the east too. So, the sunrise wasn't as spectacular as it can be. No mind. It was truly amazing. Then, the second half of our adventure was to start; a bike ride down Haleakala.


The way the activity was described on the Costco Travel website, I had envisioned that after the sunrise, we'd get on bikes at the top and just coast all the way down to the bottom. Not so. They don't allow commercial cycling companies inside Haleakala Park anymore due to some bad accidents. So, after watching the sunrise, we got bused down from 9,740 feet elevation to just outside the park entrance at 6,500 feet elevation; fully 1/3rd of the total ride. I wanted Sandy to experience the whole descent, top to bottom. Strangely, she was ok with doing only a portion of it.


We got out of the bus on the side of the road and were assigned moto-cross helmets and single speed cruiser bikes with hand operated drum brakes front and back. The drum brakes make a lot of sense. They are much more reliable and longer lasting than rim brakes. Our guides introduced themselves and then had each person in our group say their name and how long its been since they last rode a bike.

Two members in our party said they hadn't ridden a bike in more than 20 years. That was a concern to both Sandy and me. This couple was celebrating their 30th anniversary. So, they were a bit older than Sandy and me. After spending a couple of hours at near 40 temps at the top, everyone was a bit cool too.

Our guides explained that for the most part we should just brake with our right hand (rear brake) and only use the front brake for added braking power if necessary. This made me wonder why there wasn't a braking system for a bike that actuates both front and rear brakes from a single grip alleviating novice operators from having to guesstimate how much braking force they are applying with front and rear separately. 

I wanted to ride just behind Sandy. But, the guides have a different way of doing business. They put all the women ahead of all the men in reverse order of size/weight. One guide descends ahead of the group on a bike while the other is driving a van at the back. They expect us to maintain our order of position with about 30 feet spacing all the way down. I understand their reasoning. With the heaviest at the back, they have better control over speed of descent.

They have each of us do a short, 100 meter test coast to prove we can ride a bike and bring it to a stop safely. Sandy's test ride went fine. Then, we start our descent. I am second from the back. The rider just ahead is the man who is celebrating his 30th anniversary and hasn't been on a bike in more than 20 years. We're doing between 15-25 mph. For the first few minutes I am keeping my eye on Sandy several riders ahead of me. She looks rock solid. But, I notice the guy just ahead of me has a minor front wheel wobble every now and then. It never enters my conscious attention enough to say anything to him.

After another minute or two go by, I take notice of his wheel wobble again. It seems a bit worse than before. All of the sudden, in the space of 3-5 seconds, it goes from being minor to downright dangerous. "Brake! Brake! I yell out." But, I don't think he hears me. He crosses over the double yellow line into the opposing lane. Fortunately, there is no car traffic from either direction. The wobble worsens. It is out of control. At the last moment, just before he goes off the left edge of the road into a wall of sharp volcanic rock, he is thrown from the bike onto his side on the pavement. It looked awful!

I pedal over to help him. Just as quickly as he falls, he stands back up. "Are you ok?", I ask. "Yeah, I am ok." He is in shock and probably embarrassed. I don't think he is thinking straight. What I saw looked terribly painful. I really want him to take a seat on the shoulder of the road. But, he's got a gash in his left elbow that's bleeding badly. I think I see bone. He will need stitches. And, he's got road rash on his side and leg.

In the few days following the ride, Sandy and I recount all the ways in which it could have been much, much worse. When he went over the double yellow, there could have been oncoming traffic. He could have gone completely off the road into the jagged volcanic rack instead of staying on the pavement. He could have gone off the outside edge of the road and down the steep sides.

I don't think there was any problem with his bike. It was cold. And, I believe he was shivering a bit on the descent. Having not ridden a bike in many, many years, I also believe he was probably gripping the handlebars very tightly. That combination of things is almost verbatim what the last paragraph in this post on Sheldon Brown's site regarding causes of front wheel shimmy describes.

Witnessing his fall shakes me up a bit. Our group stays on the side of the road for 20 minutes while he gets some first aid. A passing bus stops to take him and his wife down to the hospital. While waiting, I talk with Sandy and inspect her bike quickly. I ask if she has been feeling any wheel wobble. I suggest to her that if she does, she should immediately brake and slow to a stop.

Our group gets going again. But, we're all a little shaken up and descending very timidly. A large gap starts forming between Sandy and the first two riders and guide at the front. Sandy now takes tight turns very slowly. Eventually, the guide decides to put Sandy in remedial downhill and asks her to change position in line to right behind him.


We stop for a short breakfast at a lavender farm. It was gorgeous. The weather was just awesome. And, the breakfast sandwich was excellent. We all finish the descent safely down to about 3,000 feet. Then, we pull off to the side to get back in the van for the ride back to the hotel.

Sandy enjoyed her experience descending Haleakala. But, we both decided it wasn't worth what we paid for it and we probably would have enjoyed it just as much and been just as safe if we had planned it all ourselves.

Friday, September 5, 2014

Bunions Shmunions

Look at my feet...


My right foot has a pretty pronounced bunion.

Personally, I think this demonstrates I am further evolved than other people who don't have bunions because my feet appear to be developing the same opposable thumb that my hands were born with ;).

In all seriousness though, bunions can be a pain, in more ways than one. This is espcially true for a grinder-type cyclist like me. So, I've had to manage the problem for many years now. In the last several years, I've taken it more seriously.

This is partly because of my 75 year old mother's feet. Men often inheret a number of their genetic tendencies from their mothers. My mother has had major problems with her feet. She has bad bunions in both feet. She's had pins inserted in several of her toes, she's had a festering infection in one of her big toes that took months to heal (or is it heel?). She's had her achilles tendon's lengthened (they make cuts not quite all the way through the tendon. Large gaps form where the tendons are cut but the tendon regrows to fill those gaps, thereby lengthening the tendons). After all of these procedures, my mother has experienced only marginal improvement in her feet. She frequently still has pain and is less able to walk long distances or at her typical fast pace.

I think my bunion started developing as early as high school. I ran cross country and track in high school. I've noticed my big toe had a funny shape to it even back then. And, sometimes the main joint at the ball of my foot would hurt. I continued running in college but gave up running in my early twenties for the bike. But, now in my fifties, I've recently started picking up running again. But, so far, I've been doing it all on a treadmill. At any rate, I've noticed the bunion is more pronounced than it once was and am worried I am heading for the same problems my mother is having.

So, I am in the market for ways to halt the progression of my bunion. I don't think it can be reversed. At least not without surgical help. And, my understanding from my PCP is that surgery doesn't too often fix the problem.

Numb Toes

Up until about 2011, I rode in tennis shoes with platform pedals and toe straps. It worked fine. But, caving to peer pressure and the belief that clipless pedals would improve my efficiency (or speed), I switched to Look pedals and a pair of $150 Specialized shoes. 

In the new shoes and pedals, after 2-3 hours of riding, my toes were going numb. I tried all sorts of remedies. I removed the basic orthodic inserts that came with the shoes and replaced them with several different kinds of orthodics including SuperFeet (the orange ones). I tried pronation and supronation wedges. I tried different thickness of sox and even orthopedic sox. All of these remedies helped to a minor degree but didn't really solve the problem. Eventually, on longer rides, no matter what I tried, my toes would go numb.

I went back to platform pedals temporarily to see if the numb toes would go away. They did! But, I was  stubornly committed to clipless pedals at this point. I concluded that the reason platform pedals worked is that they allowed the ball of my foot to move out over and in front of the pedal spindle. I wanted to see if I could achieve the same pedal/foot geometry with my clipless pedals.

However, the bolt pattern on the bottom of most shoes to support 3-bolt cleats like Look's do not permit enough fore/aft adjustment of the cleat for me to get the ball of my foot out in front of the pedal spindle. What to do?

I decided to drill new holes in the bottom of my $150.00 shoes (more about the details of that in a later post). I moved the cleat back on the bottom of the shoe almost 1/2 an inch. It worked! The balls of my feet now extend just ahead of the pedal spindles. My toes no longer go numb on long rides. The only problem is that I now have a slight toe overlap with the front wheel which I need to be cognizant of when making turns tight enough to cause the trailing edge of my front wheel to steer outside my pedals.


From the picture above, you can just barely see the original bolt holes now partly obscrued by the cleat attached in the new holes.

Third Party or Custom Insoles

The insoles that come standard with Specialized shoes are not very good. Specialized also sells a few different kinds of higher quality replacement insoles. I've tried those and several different kinds of third party insoles including SuperFeet, Dr. Schoals and Spenco. I usually have to do a 3-4 hour ride several times before I'm sure a particular product is or is not working for me. So, once I settle on a product, I tend not to want to change it. I settled on Spenco Full Lenght Orthotic Arch Supports together with metatarsal pads pictured below.


You will notice the arch support involves a solid plastic support component. It is a very strong arch support but weights a tad more than most people may be willing to tolerate too in their cycling shoes. I don't mind it at all given the comfort and support it provides.

Bunion Releif

There are a number of products out their to provide bunion releif. Many of these are designed simply to cushion the area around the bunion. I don't recommend these because they don't actually do anything to address the problem. They only address the symptoms of the problem. The symptoms are typically pain around the area of the bunion or perhaps added pressure against the skin due to the bunion pressing against the wall of the shoe.

The product that has helped my bunion problems the most is a metatarsal pad. It is a bit counter-intuitive though. You can see it as the white ovular pad in the upper part of my insole on the picture above. It actually isn't designed so much to pad anything as it is to lift something. It is designed to lift the part of the foot just behind where all the toes (metatarsals) connect. You can get pads in different thicknesses to achieve different amounts of lift. Lifting the region of the foot where the metatarsals connect takes pressure off the ball joint of the foot.

After ignoring my bunion for several years, I had lost most of the feeling on the outer edge of my big toe. I lived with it like this for several years. But, after using metatarsal pads for less than a few months, all of the feeling came back to my big toe and pain in my ball joint when away as well. I was stunned how effective these pads were.

However, when I first saw a podiatrist, he didn't take the time to explain to me proper installation of a metatarsal pad. So, when I first used them, I didn't have them installed correctly and they didn't offer me much relief. It is just very important that you place the pad so its leading edge matches the ridge where all your toes connect.

Finally, I would recommend felt as opposed to foam pads. There are a couple of problems with foam pads. First, they don't last me more than a week. So, I have to continually replace them. Thats fine. You can purchase 100 pairs of pad on Amazon for around $20.00. But, they are hard to remove due to the adhesive necessary to keep them in place. A second problem with foam pads is that they create a lot of friction with your sox. So, as you try to slide your feet in or out of your shoes, the pads grab your sox and wind up forming wrinkle ridges in your sox under you feet. Or, you can sometimes wind up peeling off a part of the pad as you slide your foot in and out of your shoe. Felt pads last much, much longer and your sox can slide over them much more easily.